Computer Forum "How To" Guides

Status
Not open for further replies.

johnb35

Administrator
Staff member
NETWORKING

Manually assign an IP address - by johnb35

Setup a Wireless Repeater - by johnb35

How To Port Forward - by C4C


PC DIAGNOSTICS

Diagnose a PC that will not POST - by spirit

Diagnose your Hard Drive - by johnb35


OPERATING SYSTEM

Install an OS of a flash drive - by lucasbytegenius

Install multiple operating systems - by AntimatterAsh

Diagnose blue screens/STOP errors - by Aastii

Clone a Hard drive - by spynoodle

SOFTWARE

Repair a Steam install - by PCunicorn

Reinstall graphic drivers - by spirit


SYSTEM PERFORMANCE

Use CCleaner - by johnb35

Speed up windows - by Aastii

Flash your BIOS - by linkin


HARDWARE

Watercool your PC - by Machin3

Setup and Manage an SSD - by Benny Boy

Build A Computer - by Darren
 
Last edited by a moderator:

johnb35

Administrator
Staff member
In this "How To" I will be explaining how to connect 2 wireless routers together in order to extend the wireless signal. I will be using the linksys WRT54G series router for explanation, I will be showing screenshots of the router configuration page with the areas that need to be changed in order for the procedure to work. Check with your own routers documentation on how to set it up like my example, only a few settings need to be changed.

Also note that this procedure will only work when you can connect the 2 routers together with an ethernet cable. If you can't then you will need a different setup using a wireless repeater or range extender. However, we will not discuss either of these in this "How To".


Step 1

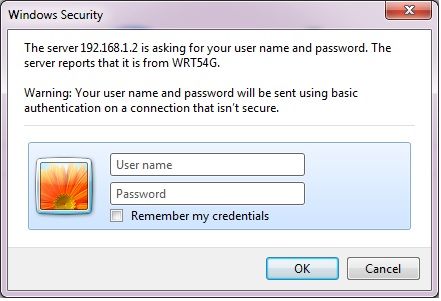
Log into your original router's configuration page. To do this, you need to enter the IP address of the router into the address bar in your web browser. For Linksys routers the IP address is usually 192.168.1.1. The router's documentation will tell you what IP address to use to access the configuration page as not all routers use the same IP address. After entering the IP address and hitting enter you should see that you need to enter a username and password to actually enter the configuration page. See the following image.


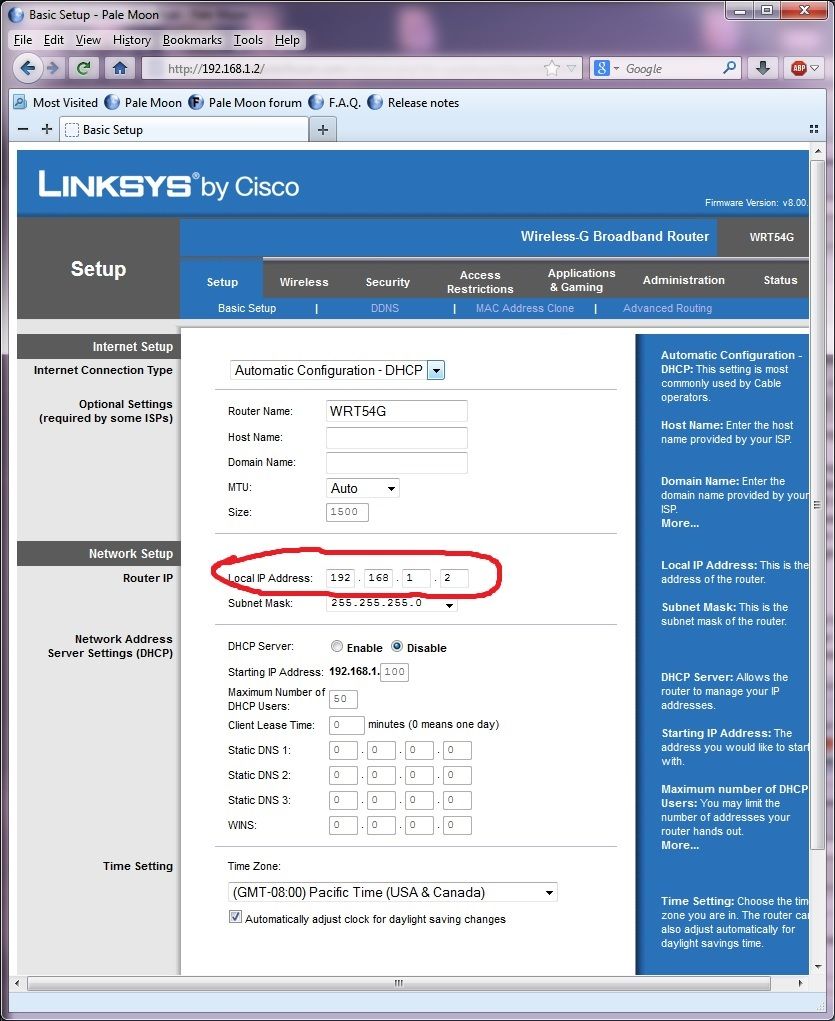
For most Linksys routers the username is left blank and the Password is "admin". Again, check your routers documentation on what the user name and password is to log into the configuration page. Once the username and password is entered and click ok, you will see a page such as this.


Notice the Internal IP address of the router is circled in red. This is the same number you use to access the router configuration page. Write that number down (along with the username and password) so you will have it when you need it. There will be no need to change any information in router 1. However, there will be some information to change on router 2.

Step 2

Connect to router 2 using an ethernet cable connected to a computer or laptop, do not connect wireless to it. You can just unhook the cable from your computer to router 1 and hook it up to router 2. So again, in your browsers address bar, enter the IP address of the second router to log into the router configuration page.

Step 2a

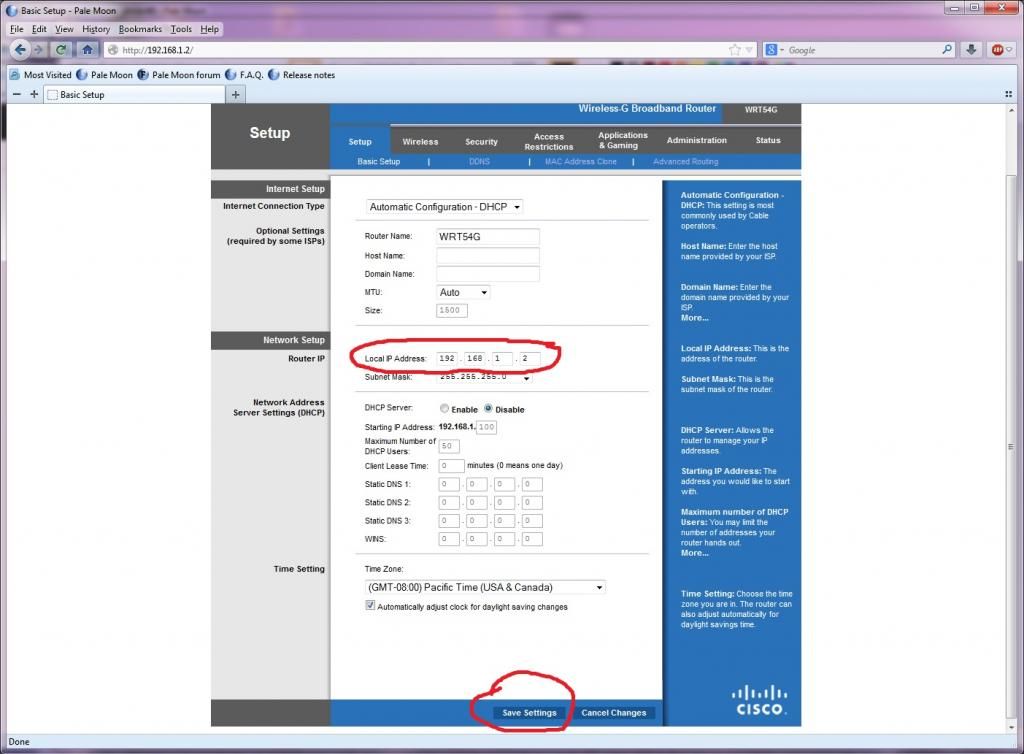
You will need to change the internal IP address of router 2 so that it doesn't conflict with router 1. If router 1 IP address is 192.168.1.1 then router 2 IP address can be 192.168.1.2. So change the internal IP address to 192.168.1.2 and click on save settings at the bottom.


After you click on save settings, you will lose connection to the router as the IP address has changed. You will need to relogin using the new IP address you changed it to.

Step 2b

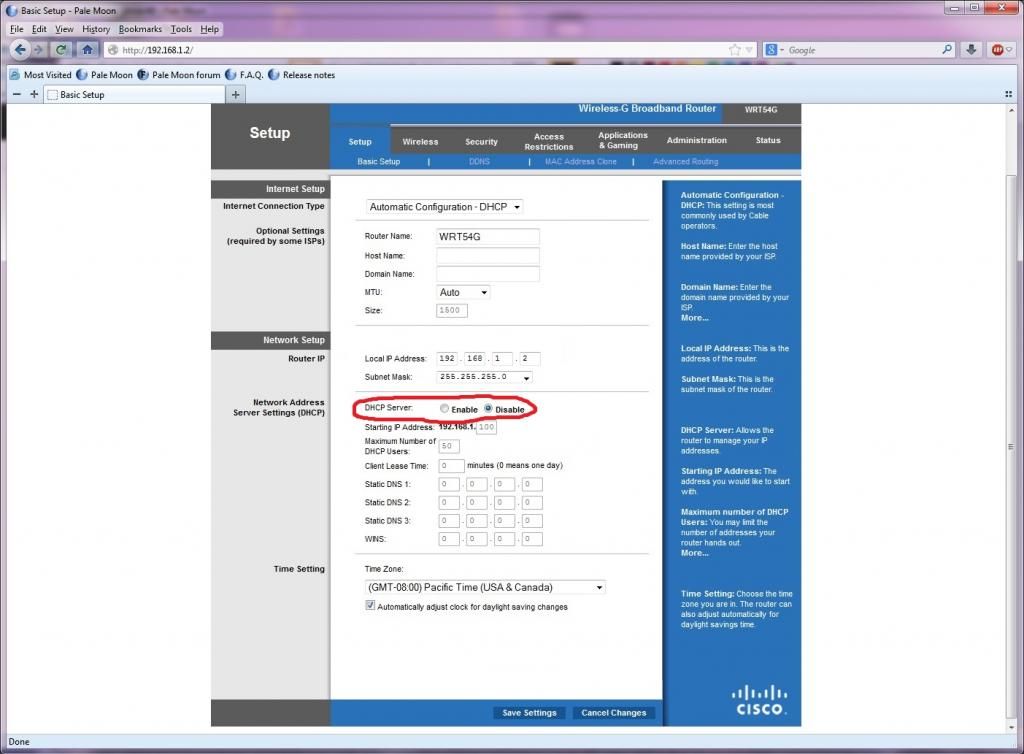
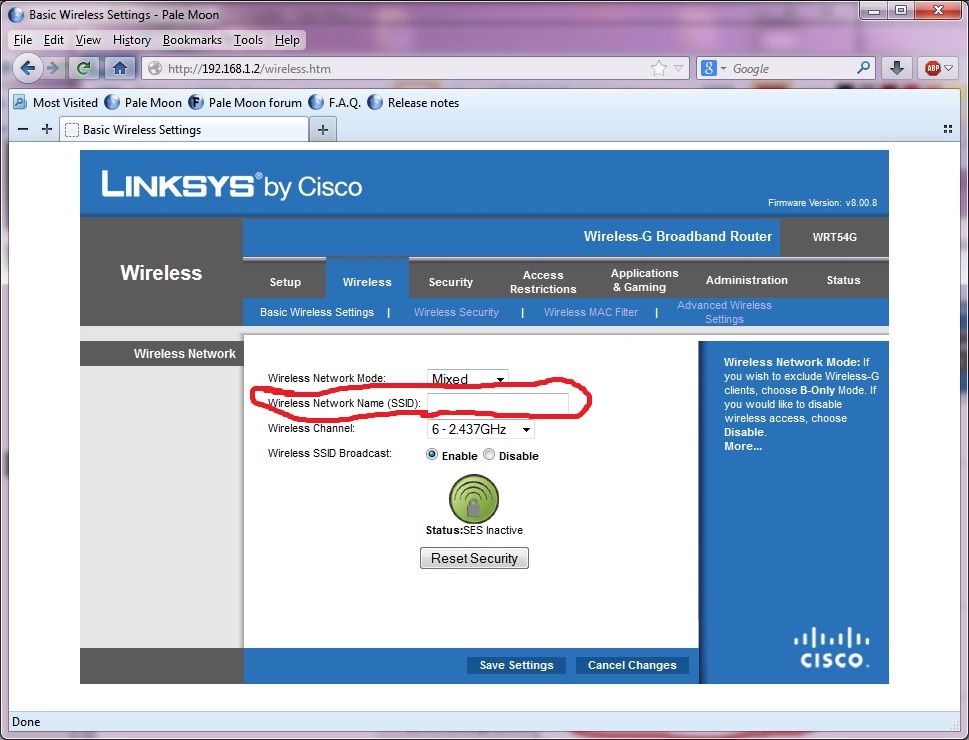
There will be 2 more settings that need to be changed. You will need to disable dhcp and possibly change the network name(SSID). See the following images.


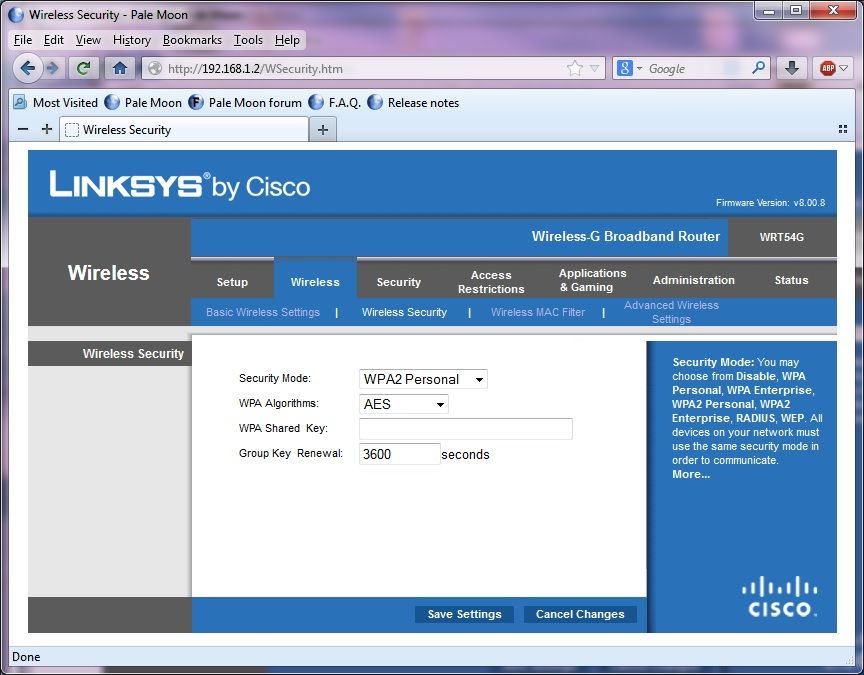
Now you can choose to leave the network name (SSID) the same as router 1 if you wish. Doing so should allow you to roam throughout the house without losing connection. Just note that if you decide to go this route that both wireless passwords must be the same and use the same security encryption. To change wireless security see next image.


I recommend using WPA2 Personal if your routers support it. If you decide to change the network name to something different then router 1, you won't be able to roam between routers. If you get too far away from the you are connected to then you may lose connection. This way of setting it up is basically for devices that don't really move throughout the house. If you move around then you will need to disconnect from one router and connect to the other. Make sure you save settings when complete. You may now disconnect from router 2.

Step 3

Now that you have changed the required settings in router 2 you need to connect the 2 routers together. You will need an ethernet cable long enough to go between the 2 routers. You need to plug one end into an lan(network) port on router 1 to an lan(network) port on router 2. The following image will show you what the lan ports look like.


kb4231-008_en.png


Please refer to Area 3 where you will see 4 lan (network) ports. Area 2 is the internet (wan) port and is only used when actually connected to a dsl or cable modem.

You should now have internet access from router 2. If not, unplug power from router 1 and router 2, then plug in power to router 1 and then plug in router 2.

Also note that this setup will also allow sharing of files and printers between all devices on the network using either router.
 

johnb35

Administrator
Staff member
In order to keep your system running at optimal speed, it is necessary to run some maintenance programs. There are many to use but we will show you how to use the program called Ccleaner (also known as Crap Cleaner) for right now. It's a good program and it would be a good idea to run it at least once every couple weeks or more often depending on how often you are online browsing the web. First off, lets explain why you need to run a program such as Ccleaner every so often.

1. The number one reason why is that for every web page you visit online, temporary internet files are stored on your system so that on the next visit, the page will in theory load faster. For example, if you go to www.yahoo.com. You will see images, banners, icons, etc. If you use Internet Explorer web browser on a windows 7 computer, these items are stored in a temporary folder stored at C:\Users\username\AppData\Local\Microsoft\Windows\Temporary Internet Files\Content.IE5\ If you use a different web browser, they store the temporary internet files in a separate location. If using Google Chrome on a windows 7 machine then they are stored at C:\Users\username\AppData\Local\Google\Chrome\User Data\Default\Cache

2. A second reason why you should run a temp file cleaner program is that every program that you install or uninstall will create temporary files. These files in theory should be deleted by the installer when completed but for the most part, they are not. This type of temp file is stored at 2 locations usually. The first location is c:\windows\temp and then second location is c:users\AppData\Local\ if running windows Vista, 7 or 8.

So now that you know the reasoning why you need to run a temp file cleaner program, lets show you how to run one, namely Ccleaner.

Download Ccleaner from this link. There is no malware included in the installer for Ccleaner so no worries there.

http://www.piriform.com/ccleaner/download/standard

After downloading, you can install the program. After installation and opening it, you may get this window here.

choosingcookies2_474x188.jpg


At this point, you can either click yes or no. If you click yes, then Ccleaner will scan all the web browsers that you use for cookies. it should bring up your persistent cookies meaning the websites that you use the most. From this list you choose to click cookies on the left and drag them to the box on the right or you can highlight the cookies you want to keep from the left box and use the top arrow in the middle that points to the right and it will transfer to the box on the right so that it saves your cookies and they won't get deleted.


The next step would be to click on the cleaner tab up top left so that this screen appears.


If this is the first time you are running the program I highly recommend to leave everything as shown checked so that it deeply cleans your system. Please note that you will lose your autologin information when accessing your favorite websites, so you will have to enter your username and password again at each website. These settings will also delete everything in the recyclebin, so if you are one of those people that like to store stuff in there(yes, I've seen people do it) it will get deleted. This process will also delete any minidump files from bluescreens that you have had with your system. These minidump files are very important when figuring out why you are getting bluescreens. If you don't want them deleted then just uncheck that particular box, same thing with the recycle bin. However, if the recycle bin is full of megabytes and gigabytes of files then your system performance will be slower. When ready to run Ccleaner you need to click on run cleaner button at the bottom right to start the cleaning process. If you have never ran a cleaner such as this, it could take up to a few minutes to complete. I've seen it on some systems take a good 5 minutes to complete. After pressing run cleaner you will get a small pop up box such as this.


You will need to click ok to actually start the process. When done the screen will look like this.


As you can see, over 15,000 temporary internet files were deleted just in Internet Explorer alone, which is really more than what you would want to have anyway. At this point you are done and you can close out of the program.

When you go and do your next cleaning process, you may want to only have the boxes checked in the following image.


So finally, running this program every couple weeks should keep your system running at optimal performance. If after running Ccleaner, you feel your system still isn't running up to par then you may have other issues which may include malware/viruses and would need other programs to delete them.
 

johnb35

Administrator
Staff member
In this "How To" we will show you how to manually assign your pc an IP address. In some network setups, it is sometimes required to manually assign a static IP address to a PC, especially if its some sort of network server. The process for doing this is basically the same for Windows Vista through Windows 8.1, however, its just a tad different for Windows XP if you so happen to be running it.

Step 1

First of all, lets run a dos command so we can save a few entries we will need at a later time in this How To.

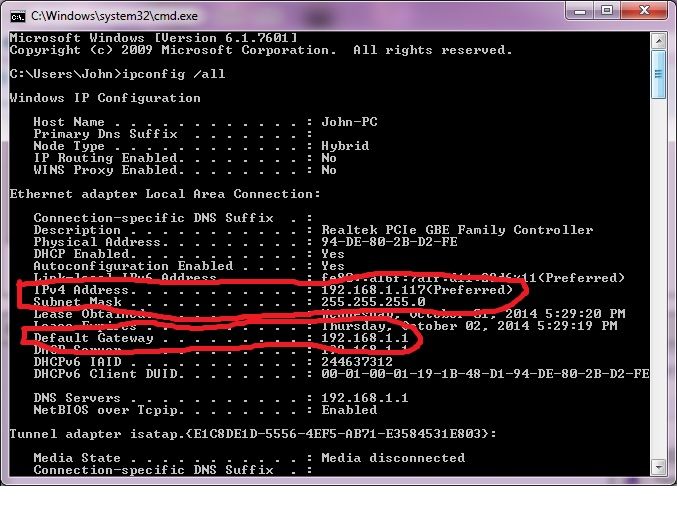
Open a command prompt by typing cmd in the search box and hit enter. Type in the following ipconfig /all and hit enter. Note: There is a space between the g and the /. It won't work without the space. Then write down the numbers that correspond to the ones circled in red in the following image.

1. IP address
2. Subnet Mask
3. Default Gateway


Step 2

For users running Windows Vista through 8.1

The easiest way to access the Internet Protocol properties is to do the following.

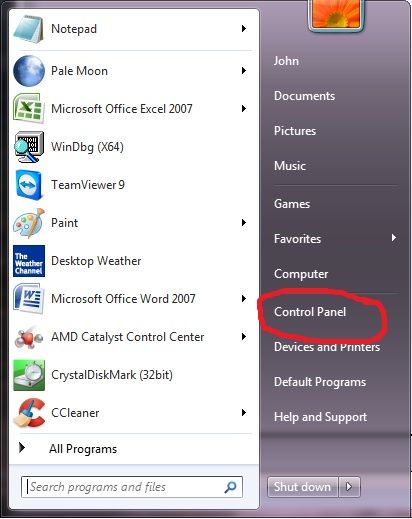
Click on the start button and click on Control Panel.


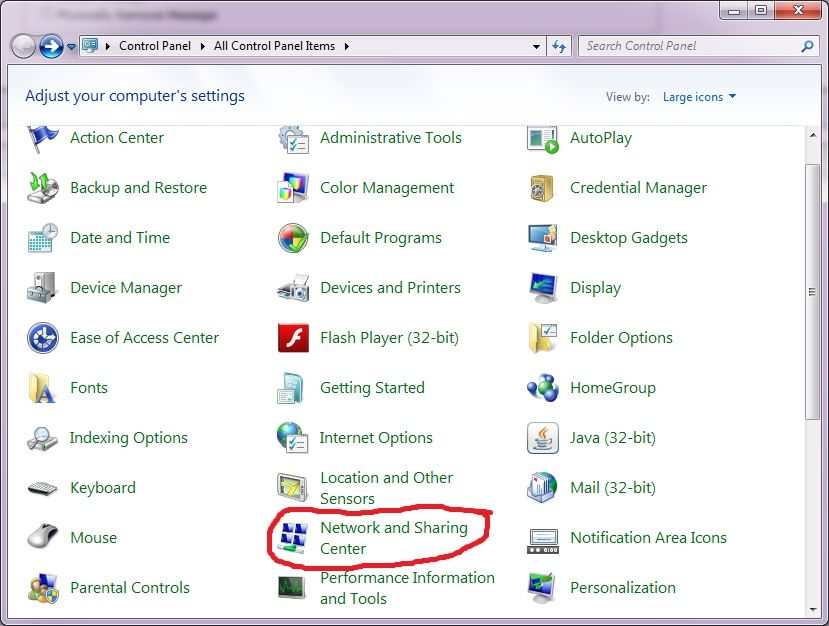
Then click on Network and Sharing Center.


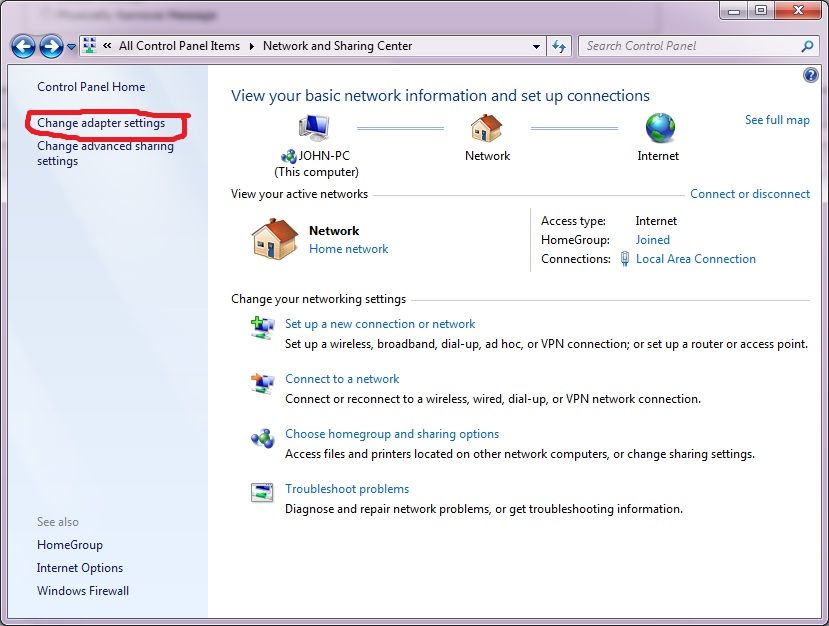
Then click on change adapter settings. If running Vista you will need to click on mange network connections.


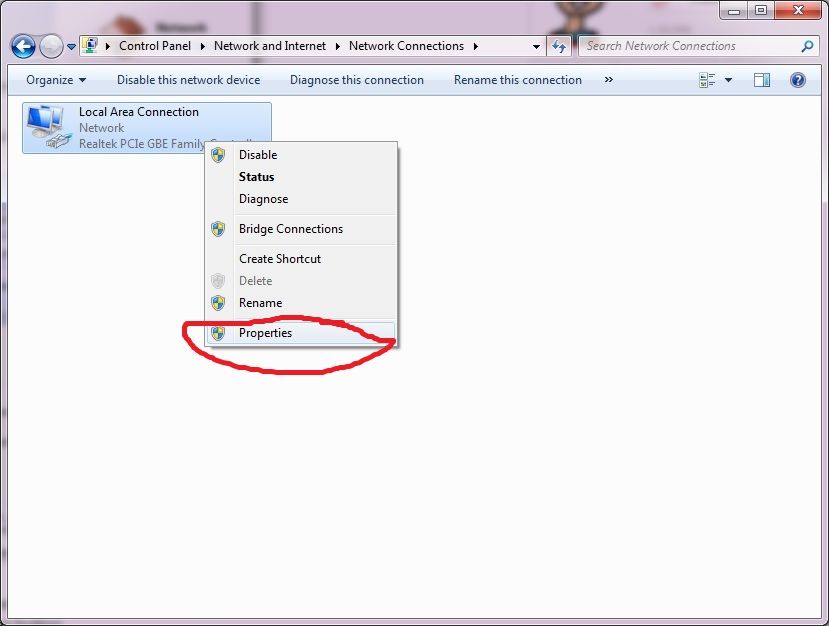
Right click on local area connection or wireless connection depending on what type you are using and right click, click on properties.


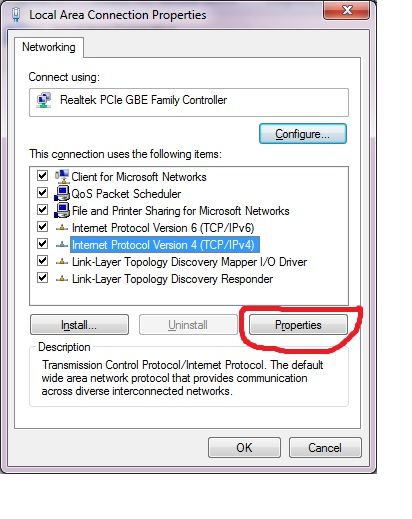
Highlight Internet Protocol Version 4 and click on properties.


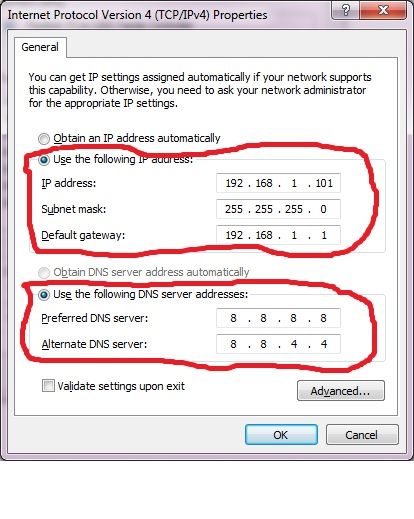
You will need to click the radio button so that "use the following IP address" is checked.


At that point, you will need to enter the specific IP address you want to set along with the subnet mask and default gateway. The subnet mask is always usually 255.255.255.0. The default gateway is the IP address of your router/gateway. However, use the numbers that you received from step 1 above. Once you change the option to manually assign an IP address you will also notice that the button "use the following dns server addresses is now checked so you will have to enter those as well. At this point you have 2 options.

1. You will have to enter your own IP providers dns server addresses.
2. You can enter Google's dns server addresses.

You will notice that the numbers entered are Googles dns server addresses of 8.8.8.8 and 8.8.4.4. You must enter both the preferred and the alternate servers.

When you are done, click ok to save your changes and exit out of everything and check your internet connection.

For users running XP.

The easiest way is to access the Internet Protocol properties is to right click on my network places icon and click on properties. Right click on lan or wireless adapter depending on what you are using and click on properties again. On the general tab, highlight Internet protocol (tcp/ip) and click on properties. You will now be seeing the page where you can change IP address and dns servers as we did above when using windows vista through 8.1. Follow the same procedure as before.
 
Status
Not open for further replies.
Top