Machin3
New Member
Liquid Cooling 101
Updated: April 2012
1. Introduction
Computer technology is constantly evolving. As new components are introduced onto the market, they require better methods of cooling. We are familiar with the standard heat sink, consisting of a copper base with fins which is cooled by 1 or 2 fans. Liquid Cooling, on the contrary, is a different type of cooling that we may all not be so familiar with. In fact, we commonly ask ourselves what liquid cooling is. To simply put it, liquid cooling is a closed loop system that incorporates water as a means of cooling. You may ask yourself, "Water? How can water and pc cooling go together?" You've come to the right place. In this guide, I will be teaching you about the essentials of liquid cooling, what you will need, and how to get started.
First off, I have some abbreviations listed below that I will use so that I don't have to write out the complete phrase. This is a legend in case you are not clear about an abbreviation.
- Radiator: Rad
- Processor: CPU
- Video Card: GPU
- TIM: Thermal Paste
- Loop: Liquid Cooling Setup
- Blocks: Water block
- Rig: Computer Setup
2. How does a liquid cooling system work?
To simply put it in words, liquid cooling works by removing heat from your cpu and gpu through liquid which travels through a set of tubes that connects to a radiator. Water has a thermal conductivity of 0.6062 W/ (m*K) whereas the thermal conductivity of air is only 0.0262. This means heat can be drawn away from components more efficiently with water.
It all starts with your processor, video card, and in some cases your motherboard. Water blocks are placed on your processor and video card and act like a normal heat sink but cannot be cooled by a fan. Your water blocks, pump, radiators, and reservoir all have fittings installed which allows the tubing to be installed. The pump is responsible for moving liquid throughout the liquid cooling setup. There are a variety of ways that a loop is set up but that will be covered later in this guide. As your cpu gives off heat, water travels through the water block which collects heat much like a copper pipe heat. The heat travels through the water in the tubing to the radiator(s) where the heat is dissipated throughout the radiator fins. The fans mounted to the radiator transfer air throughout the radiator cooling the radiator.
3. Where can I get my parts?
There are numerous stores where you can pick up your liquid Cooling parts. The only physical store that I can think of is Micro Center which has some locations scattered across the US and Performance-PCs in Florida also has a walk-in store. Other than those two, most of the components are purchased online from direct manufacturer or some retail vendors. Here's a list of the most popular stores:
United States:
Performance-PCs
Silicon Valley Compucycle
Jab-Tech
Sidewinder Computers
Frozen CPU
Xoxide
Petra's Tech Shop
UK:
Watercooling UK
The Cooling Shop
Cand C Central
Australia:
PC Case Gear
GAM Mods
Canada:
NCIX
New Type Computer Workshop
Direct Canada
4. How much will a liquid cooling setup cost me?
It all very much depends on what you want to liquid cool and how much you are willing to spend on parts. On average, most people want to liquid cool just their cpu. Others liquid cool their processor, video card, ram, and motherboard. The more components you want to liquid cool, the higher the budget will have to be set. Most liquid cooling setups start at around $200. As more and more components are liquid cooled, the price starts to rise and can easily get to $500+. It is essential to plan out what you want to liquid cool and look around on the internet for deals. Don't just set yourself on one website. As much as I stress that the pump should be purchased brand new, purchasing other parts used such as fittings, radiators, and reservoirs doesn't hurt at all. Just make sure that you are buying from a trusted user and ask questions about the condition and how long they have had the parts. You can also purchase pre-made kits from EK and XSPC to save some money.
5. Parts: What will I need for my setup?
The market for liquid cooling has vastly expanded recently. 5 years ago, there was not a lot to choose for your rig. As technology has evolved in new video cards and processors, we started to look for ways to efficiently cool our components. In today's market, anytime a new video card is released, a water block is released to cool that card. Here is a list to show you what items are needed for a basic liquid cooling setup.
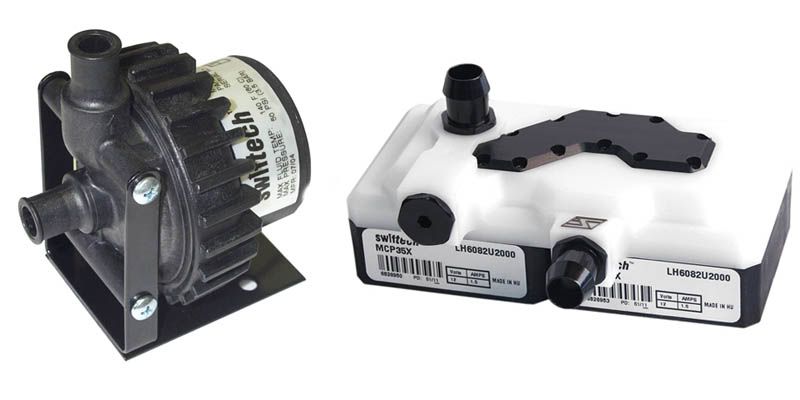
• Pumps: The pump is the most important component because it is responsible for flowing water throughout the set up. There is a vast selection of pumps, all catered to your specific needs. The most common types of pumps are dual port pumps; meaning, 1 inlet and 1 outlet. There are also dual pumps for bigger cases when you need that extra power to flow you water.
Always make sure to read reviews and buy a good brand pump. Purchasing a poor performance and unreliable pump may cause problems in the future. Remember that if you can flow water throughout the system, then your liquid cooling will be useless.
Best Brands: [Swiftech, Danger Den, Liang, EK].
Swiftech sells the most popular pump available on the market. The Swiftech MCP655 (picture shown below) packs enough power to run water through any standard micro, mid, and full tower case.
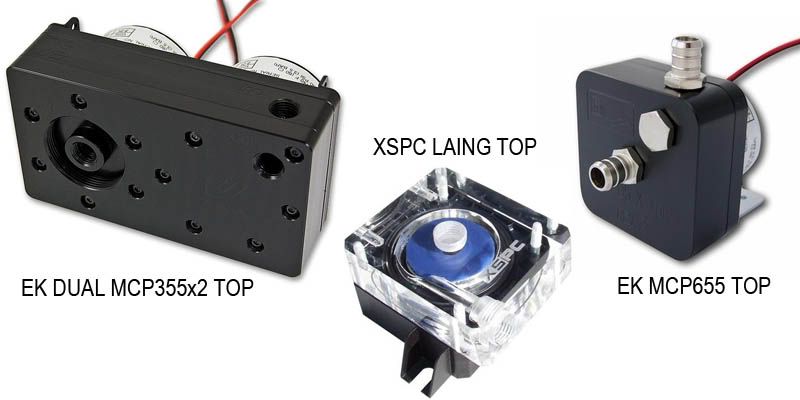
• Pump Tops: Pump Tops are a great way to accessorize your pump and they have added uses to them also. A pump usually has 3/8" ports. A pump top allows you to add any size barb or compression fitting to the pump. It will allow you to use 1/2" tubing and pretty much any other size tubing. Pump Tops also increase the performance of the pump to the maximum. The most common tops are made for the MCP335, MCP335x2, and the MCP655 pump from Swiftech.
Best Brands: [EK, XSPC, Bitspower]
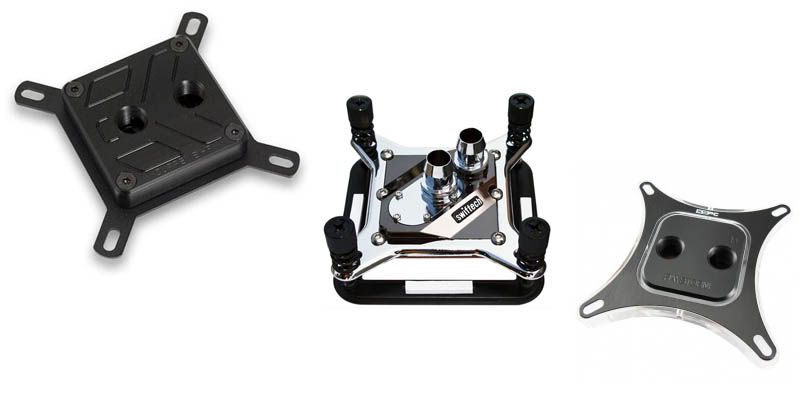
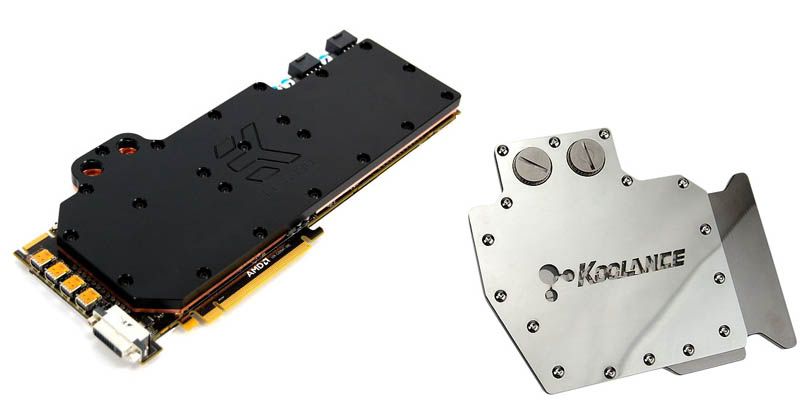
• Water blocks: The water block is placed on your processor (CPU) and video card (GPU). This component allows liquid to cool the cpu and gpu. They work much like a heat sink but use liquid to cool instead of a fan.
There are two major finishes to water blocks: copper and nickel. Nickel blocks have the nicest finish and are also the most reliable but come with a high price. Copper is in a close second and is a bit cheaper than nickel. Copper is also the most common out there.
Best Brands: CPU [ EK, Danger Den, XSPC, Swiftech]
GPU [Bitspower, EK, Koolance]
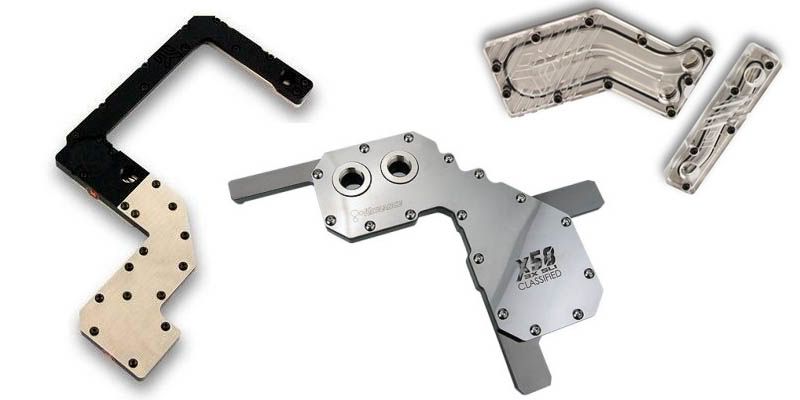
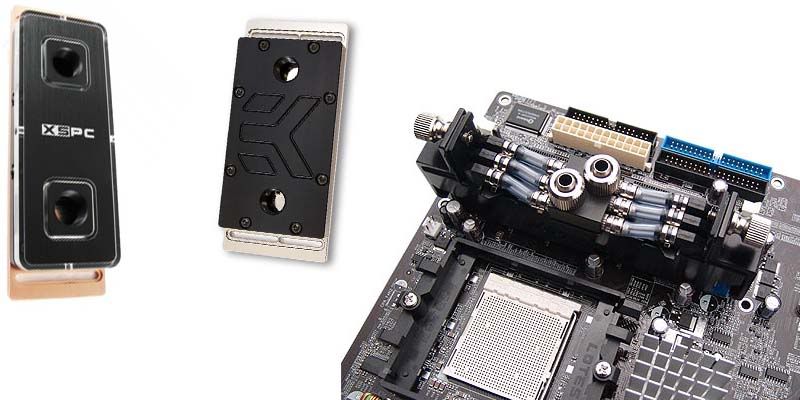
You also have the option now to liquid cool your motherboard north and south bridges. The reason you can liquid cool these is because when you overclock your cpu, you also increase the voltages on your north/south bridge which causes the temperature to go up for both. This isn't an essential component to liquid cool but you are always welcome to do so.
Last but not least, you also have the option to liquid cool your memory (RAM). This also isn't quite common but it will help lower the temperature of your RAM when you overclock them to higher speeds. A simple RAM fan may help but when you need that extra umph in your clock speeds, liquid cooling will help bring that temperature down.
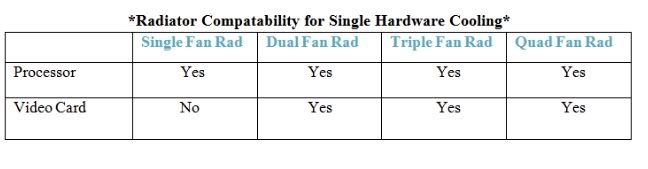
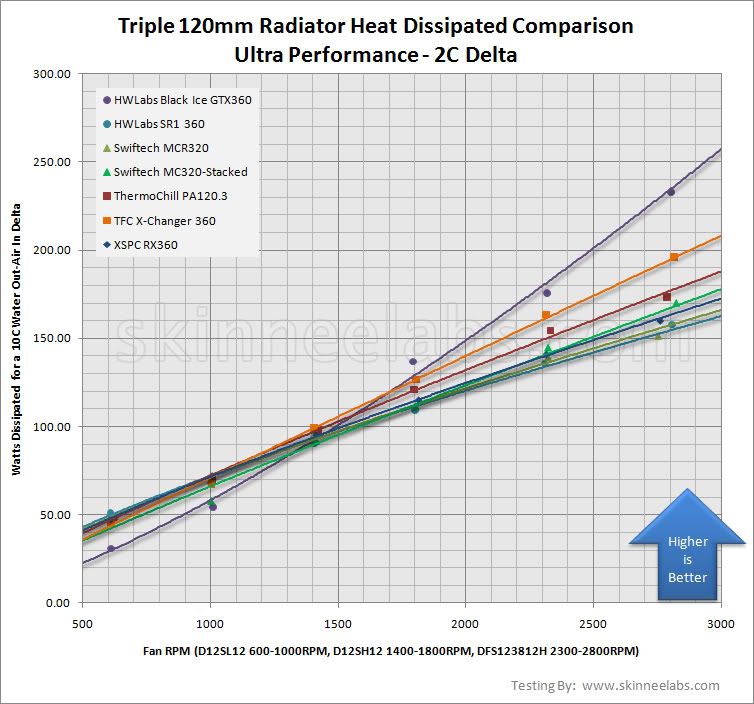
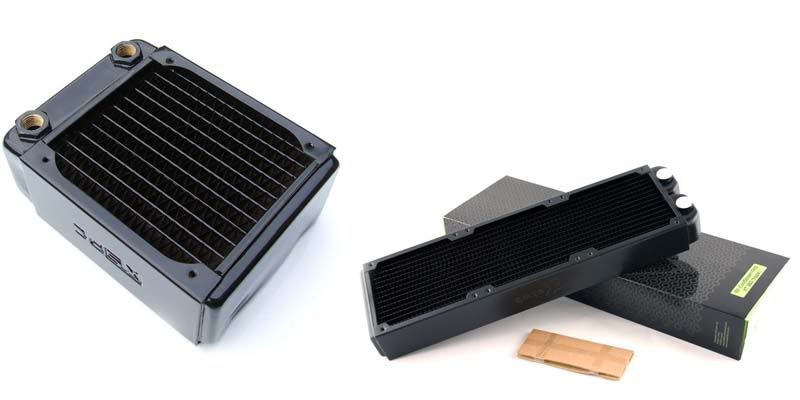
• Radiators: The radiator is also an important item in a liquid cooling setup. The radiator removes heat from water and dissipates it along its fins. It is important to pay attention to the type of radiator being purchased. Radiators can be thick or slim. They can also have closely spaced fins or farther spread fins. This will determine what kind of fans you will need to cool the radiator.
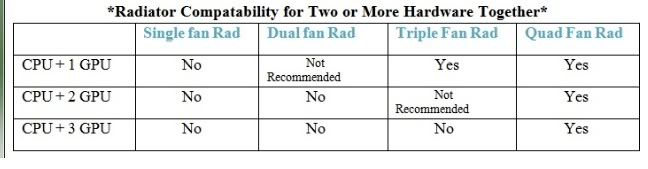
There is also the question of what size radiator to get. You want to get a radiator that will fit 120mm fans. You can also get a radiator which fits 140mm fans but make sure you are able to fit the radiator inside your case. Next, you have a choice of single, double, triple, and quadruple fan radiators. Below is a chart to show you and estimate of what will fit your cooling needs.
If you are not able to fit a specific radiator in your case due to its length, you can install more than one radiator to accommodate your needs. You can also install your radiator outside of your case but you will need a special bracket.
Best Brands: [XSPC, Black Ice, Swiftech, EK, Fesser]
• Reservoirs: The reservoir is an optional component for your liquid cooling setup. I strongly recommend purchasing and installing a reservoir to monitor your levels of fluid in the loop. It is also easier to fill your loop when you have a reservoir installed.
Reservoirs provide multiple ports for you to install your tubing. A reservoir will enable you to install a drain port and a fill port for easy filling and draining. If you do not wish to purchase a reservoir, a t-line in your loop will also provide for a drain port.
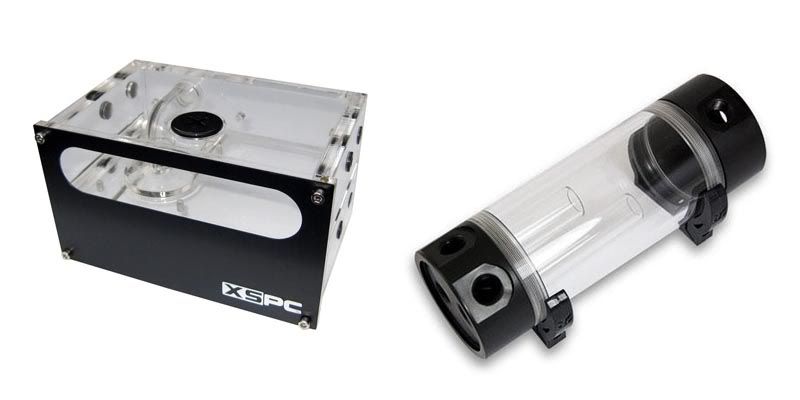
You can also find radiators that have a pump built into the reservoir itself. These types of radiator / pump combos are getting increasingly popular because of the amount of space they save.
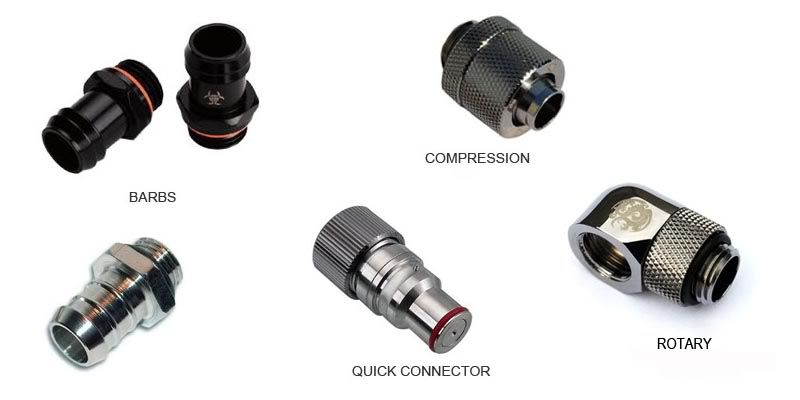
• Fittings & Tubing: In order for you to connect your tubing to the waterblocks, pump, radiator(s), and reservoir, you need to have fittings. There are a couple of different styles of fittings out there that you can use. You will find two materials that fittings can be made of; metal and plastic. I do not recommend plastic fittings because they can easily break or get damaged if not handled properly.
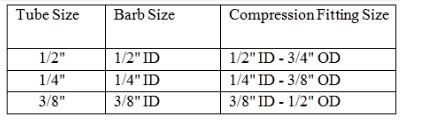
The main thing you have to look for is the correct size of the fitting. Thread size is universal: 1/4". You will also see that a fitting can be a barb or compression fitting. A fitting's port size is what you have to pay attention to. There are a variety of tube sizes that have to be compatible with a fitting size.
• Tubing: There are different brands of tubing and sizes to choose from. Primo Chill and Tygon tubing are brands most used. Primo Chill offers tubing in a variety of colors while Tygon is a simple clear tubing. These brands offer tubing that can be bent enough while still avoiding kinks.
Make sure your tubing does not have to much of a bend or it will kink which will cause liquid flow restriction.
Best Brands: [Primo Chill, Tygon, EK]

• Fittings: There are barb fittings and compression fittings. Barb fittings are cheaper but require clamps to hold them in place. Compression fittings use a ring that screws onto the barb part where the tubing and barb fitting meet to hold it in place, thus eliminating the need for a clamp. Here is a chart when choosing tubing and barbs.
Best Brands: [Bitspower, EK, Enzotech]
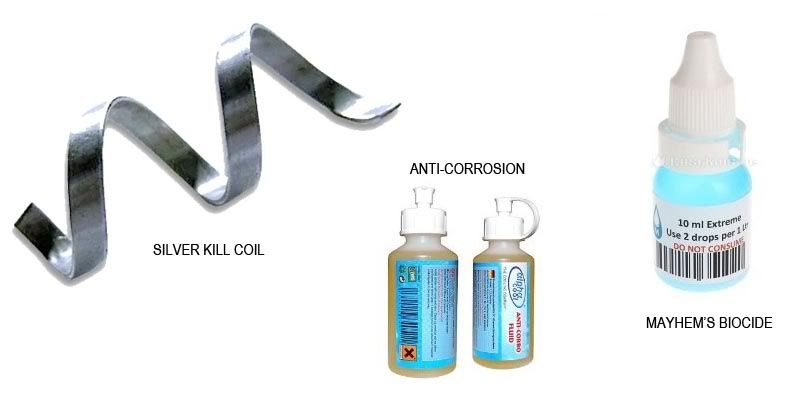
• Coolant & Additives: When choosing coolant for your setup, it is important to know what you are going to choose. Stay away from the top brand coolants that have dye added. This includes products that are UV reactive or colorful coolants. These coolants will create gunk and sludge in your fitting and blocks over a period of time which will slow the flow of liquid and may damage your water blocks. It is best to just get Distilled Water, such as at your local Walmart or grocery store.
I would also recommend adding a silver kill coil or a biocide / corrosion proof additive to your loop. A silver kill coil and biocide will prevent algae growth in your liquid cooling system. Anti- Corrosive additives will prevent corrosion in your water blocks and fittings.
Best Brands: [Distilled Water, PT-Nuke, Silver Coil]
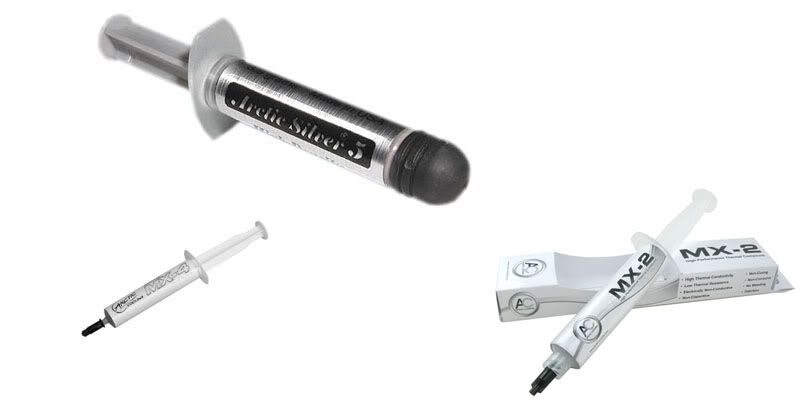
• Thermal Paste (TIM): There are many thermal pastes out there for you to choose but not all of them are good. For example, the TIM you get on a stock heat sink with your new cpu is not good. Also, the "white glue" looking paste is also bad. In fact I wouldn't be surprised if it is glue.
You can also purchase Arctic Silver Thermal paste remover to help you remove old TIM before applying new TIM. If you don't want to spend the money you can get some rubbing alcohol, cotton balls, and q-tips to remove it also.
Best Brands: [Arctic Silver- (5, MX-2, MX-4), Shin Etsu, Indigo Extreme]
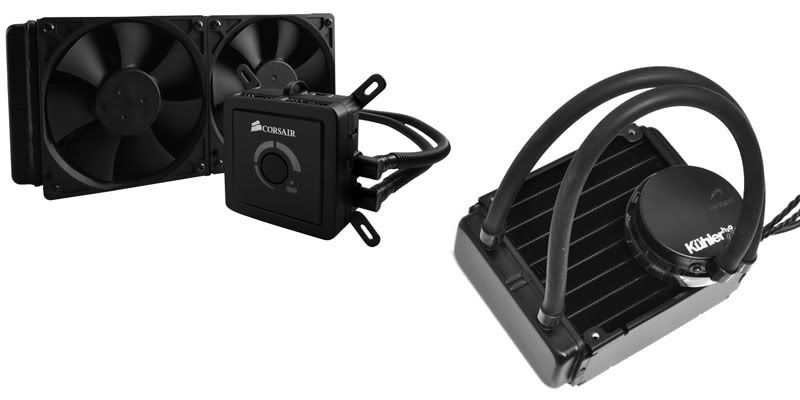
• Standalone Kits: If this guide looks too confusing to you or you feel that you are not ready to liquid cool your rig yet there are other, cheaper but yet effective options. Standalone kits, or all-in-one kits, are relatively cheap kits made by companies such as Corsair and Antec that provide water cooling for your cpu in an all-in-one kit that includes a radiator/pump combo, water block, and tubing. These are great products if you feel uncomfortable with a full water cooling setup.
These coolers do not have to be maintained or changed. You only have to dust out the radiator over time. You do not have to change the liquid at all.
Best Brands: [Corsair H-Series, Antec Kuhler Series]
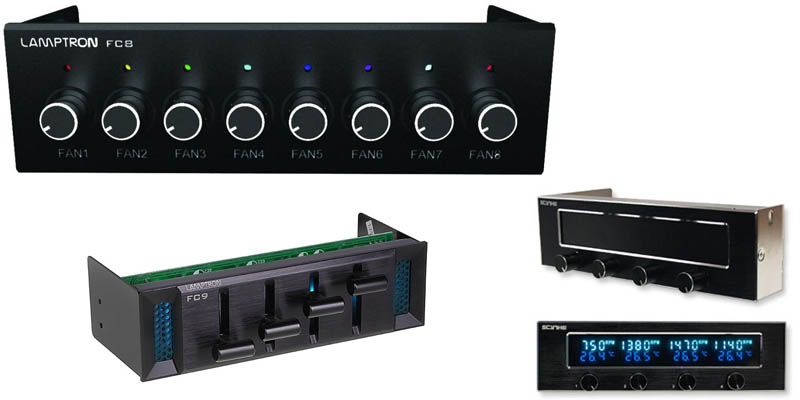
• Fan Controllers: If you are bothered by the noise that your fans produce, you can purchase a fan controller to turn down the RPM's of the fan. Doing so will slow down the fan and thus it will be quieter. There are many styles of fan controllers ranging from simple knobs to touch screen controllers. I recommend staying away from touch screen controllers as many reviews state they they do not work as good.
Best Brands: [Lamptron, Zalman, Scythe]
6. Putting it all together
After buying all your parts, it is now time to put everything together. Make sure to read instruction included with products carefully for mounting components and such.
• CPU Block Mounting: Make sure that you clarify in the instructions the proper mounting of the cpu water block. Apply recommended amount of TIM thermal paste and do not over tighten the block as you might break your processor or damage the motherboard.
• GPU Block Mounting: Clarify in the instructions the proper mounting of the gpu water block. Be careful not to strip screws when removing the stock fan and heat. These screws are extremely small and can be easily damaged. Be careful when handling the video card to prevent damage to the chips.
When you remove the stock fan and heat sink, clean off remaining thermal paste from main video card processor and memory chips. You will also be provided with thermal pads to place on your memory chips.
• Radiator Mounting: You can mount your radiator in a variety of places. Most commonly, the radiator is mounted on the top of the case. You can also mount a single fan radiator on the exhaust vent in the rear of the case and a single or double radiator in the front of the case if you have room to do so. If you are skilled with modifying a case, you can mount a radiator on the bottom of the case. Lastly, you can also mount a radiator outside of your case in the rear, but you will need a special holding bracket.
• Reservoir Mounting: There are two types of reservoirs that are mounted in two different ways. There are bay reservoirs which fit into your bay drive and there are reservoirs which come with brackets and can be mounted on the motherboard tray or anywhere else inside the case.
• Pump Mounting: You can place your pump freely inside the case or you can also securely screw it into the case. Your pump is also provided with a special foam pad to reduce vibration. You can mount you pump in any way as long as its not mounted upside down. Also, make sure to check instructions for inlet / outlet ports. There is a specific port for each.
• Installing the Tubing: To install your tubing, simply take your tubing and estimate how much you will need to cut to get the right fit. It is better to leave more then to cut too much off. There is no specific way of measuring. It is just simply taking your tubing holding it from one fitting to the other, ensuring there is no kink or sharp bend and cutting it where it needs to be cut.
• Determining Water Flow Direction: To determine the water flow direction I will provide you with an order to follow:
Reservoir (should be mounted above the pump; pump should always have water or it will break) > Inlet of Pump > Outlet of Pump > Inlet of Radiator (you choose port) > Outlet Radiator > Inlet CPU > Outlet CPU > Inlet GPU (you chose port) > Outlet GPU > Reservoir
• Connecting Your Loop (Test Phase): Be sure to test your parts prior to installing them in you case. This will assure you that you have no leaks, no broken parts, and that everything is functioning correctly.
Be sure to check your cpu water block instructions to clarify the inlet and outlet port as there is a specific port for each. The gpu water block ports don't have a specific inlet / outlet port. Make sure that your fittings are securely screwed on but don't over tighten them to the extreme becuase you will break the o-rings.
When filling reservoir or loop with water, there is no specific way to bleed the system all at once. You have to fill it to the max, turn on your power supply by jumping with green and black wires with a paperclip, let the water drain into the loop and then turn off the power supply. Then just repeat the process.
Do not let the pump run without water being constantly fed because you will break your pump.
Once you have ensured that everything works fine, let it run for a couple of minutes, then drain it completely and install everything into your computer. Once again, fill up the liquid cooling loop and this time let it run for a couple of hours. Make sure that your video card, processor, and motherboard are not plugged in becuase if you have a leak, it will damage your components. It is best to just leave everything unplugged in the case and let your loop run for about an hour or two.
Tips & Reminders:
• Make sure your water blocks are compatible with your components.
• Try to stick with one type of plating, such as, only nickel or only copper.
• Ensure that tubing is installed correctly and free of kinks.
• Remember that your pump always need a supply of water constantly.
• When using distilled water, add a biocide, silver coil, and/or anti-corrosive.
• Use the correct amount of Thermal Paste that is stated in the instructions.
• Test your loop outside of the case first, then install it inside.
[UT]Xklgv4W9gFU[/UT][UT]8qUqkX-3ut4[/UT]
[UT]OpQB2EoeXA0[/UT][UT]8vtx3LNAeyw[/UT]
[UT]OpQB2EoeXA0[/UT][UT]8vtx3LNAeyw[/UT]
7. Conclusion
Liquid Cooling is not a project for everyone. If you at all feel uncomfortable with liquid cooling, stop, and do yourself a favor and just get an all-in-one cooler. They work great and will give you the peace of mind. If you read this guide and you feel that you still have questions, feel free to contact me at any time or write in this thread. I'll be happy to answer your questions.
Last edited:

")