You are using an out of date browser. It may not display this or other websites correctly.
You should upgrade or use an alternative browser.
You should upgrade or use an alternative browser.
Trying Clean Install to XP
- Thread starter mc_blue
- Start date
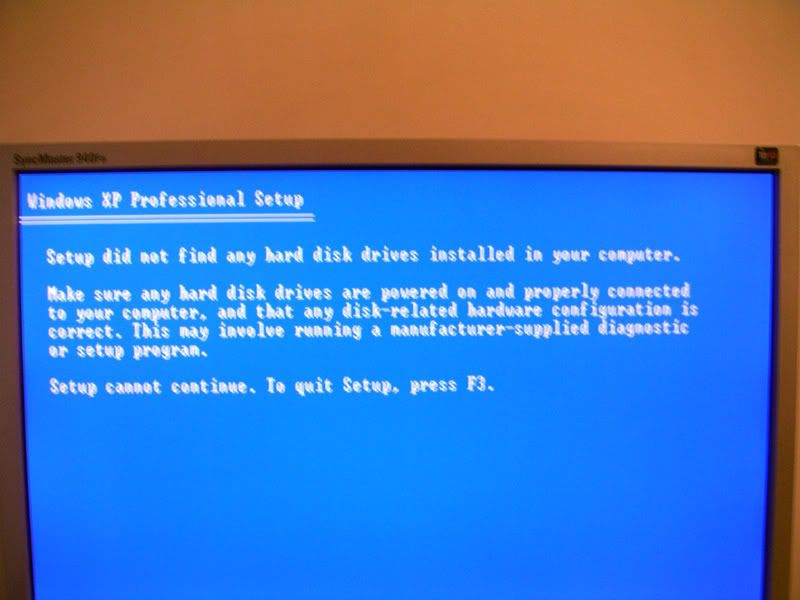
You usually have the immediate option for the F2, F4, or F6 key to be pressed when first getting through the post tests to load sata drivers from a floppy. Unlike ide drives the installer won't detect a sata drive until those drivers are loaded properly. In some cases even that has problems at times.
You usually have the immediate option for the F2, F4, or F6 key to be pressed when first getting through the post tests to load sata drivers from a floppy. Unlike ide drives the installer won't detect a sata drive until those drivers are loaded properly. In some cases even that has problems at times.
Thanks for this - I've stalled on upgrading my PC and I'm not the best with computers. What's the best option here - try one of those keys first? Alternatively, do I need to locate a driver for my hard disk that the install will recognise?
Cheers
driver for your sata controller, not the hdd driver.
The motherboard is an ASUS K8V kind people.
With Windows running place the software cd that came along with the board in your cd or dvd drive as well as placing a blank floppy in that one. Once the opening menu loads you will see the option to create a driver floppy for installing sata drives. This is the way Asus has their software setup. When the next opens you will have the option to create the disk right then where the list of Windows versions is shown like XP 32bit, XP 64bit, 2000, ME. 98. The other option is to format the disk. Use that first. For some reason the XP installer will load the drivers copied later a lot easier this way.
Once the floppy is formatted proceed with the option to create the driver disk and then boot from the XP once you have that in the drive. Right when the first screen comes up the option to press the F6 key for installing sata/raid will be seen at that time. So press that button right away. This will then proceed to load the drivers from the floppy. If any didn't copy to the 3 1/2" from the board cd you will see that error message appear soon.
The alternate way is to first boot with the board's cd to create the driver disk when that screen comes up. For some reason you are more likely to the error message about one driver and have to redo it all over again. When the drivers are sucessfully loaded the XP installer will reach the screen where you choose between pressing R for the recover console or enter to start the installation going. Once in the following screen you should readily see the dirve plainly listed by make and model number along with the total drive space available. If you want more then one partition you simply lower the total seen in the counter there. Either way the installer will then create the new partition if needed and format it for the copy of the setup files to the drive. Aftwards you simply reboot and hopefully have the drive set as the first in the boot order.
With Windows running place the software cd that came along with the board in your cd or dvd drive as well as placing a blank floppy in that one. Once the opening menu loads you will see the option to create a driver floppy for installing sata drives. This is the way Asus has their software setup. When the next opens you will have the option to create the disk right then where the list of Windows versions is shown like XP 32bit, XP 64bit, 2000, ME. 98. The other option is to format the disk. Use that first. For some reason the XP installer will load the drivers copied later a lot easier this way.
Once the floppy is formatted proceed with the option to create the driver disk and then boot from the XP once you have that in the drive. Right when the first screen comes up the option to press the F6 key for installing sata/raid will be seen at that time. So press that button right away. This will then proceed to load the drivers from the floppy. If any didn't copy to the 3 1/2" from the board cd you will see that error message appear soon.
The alternate way is to first boot with the board's cd to create the driver disk when that screen comes up. For some reason you are more likely to the error message about one driver and have to redo it all over again. When the drivers are sucessfully loaded the XP installer will reach the screen where you choose between pressing R for the recover console or enter to start the installation going. Once in the following screen you should readily see the dirve plainly listed by make and model number along with the total drive space available. If you want more then one partition you simply lower the total seen in the counter there. Either way the installer will then create the new partition if needed and format it for the copy of the setup files to the drive. Aftwards you simply reboot and hopefully have the drive set as the first in the boot order.
Excellent! I'll give this a go tomorrow and let you all know - superb!
CCPS
New Member
if you cant find any hdd in your computer , check your ide cable or your sta cable make sure it works fine. and make sure the jumpers are hooked up right . then if try it , if not check cd clean it because they did it to me 3 time before and i clean the cd and worked. try that buddy.
Well you won't have to worry about druve jumpers and what connector is used on a "one way fit" sata cable. There is no jumper on sata drives since their priority depends on which sata master they are. sata master #1, #2, #3, #4, and more on many newer boards.
Making the disk up while running the software disk to format the floppy and copy the drivers seems to work far better that way then booting with the software disk and doing it that way for some reason. Asus boards are like this alot.
Making the disk up while running the software disk to format the floppy and copy the drivers seems to work far better that way then booting with the software disk and doing it that way for some reason. Asus boards are like this alot.
The best pair of queations here are what type of service and how are you connected? dsl, cable, or dialup? XP already has several modem drivers included for dialup. If you are using usb to connect to a router like a residential gateway you can right click on any "other devices" yellowed marked under network devices and choose the update driver option. Then select "network adapter" from a list of devices in order to browse to the folder or disk where the ISP drivers are located. Windows will then copy and install those once the correct driver is selected there.