Hello and welcome to CoFo! This guide will detail how to assemble your shiny stack of parts into a new computer. Plan to spend 2-3 hours if this is your first time building. Keep in mind that these steps can and probably will vary depending on your set up and what components you have to work with. For example you might have a sound card you’re installing or more hard drives. Head over to the Desktop Computer section if you need help with a parts list.
Disclaimer: I assume no responsibility for damaging of parts or anything else as a result of you following this guide. I have built several computers and am confident in my abilities, just be aware that following this guide agrees that you do it all at your own risk. Also make use of any manuals that come with your specific hardware if you are unsure, particularly your motherboard manual.
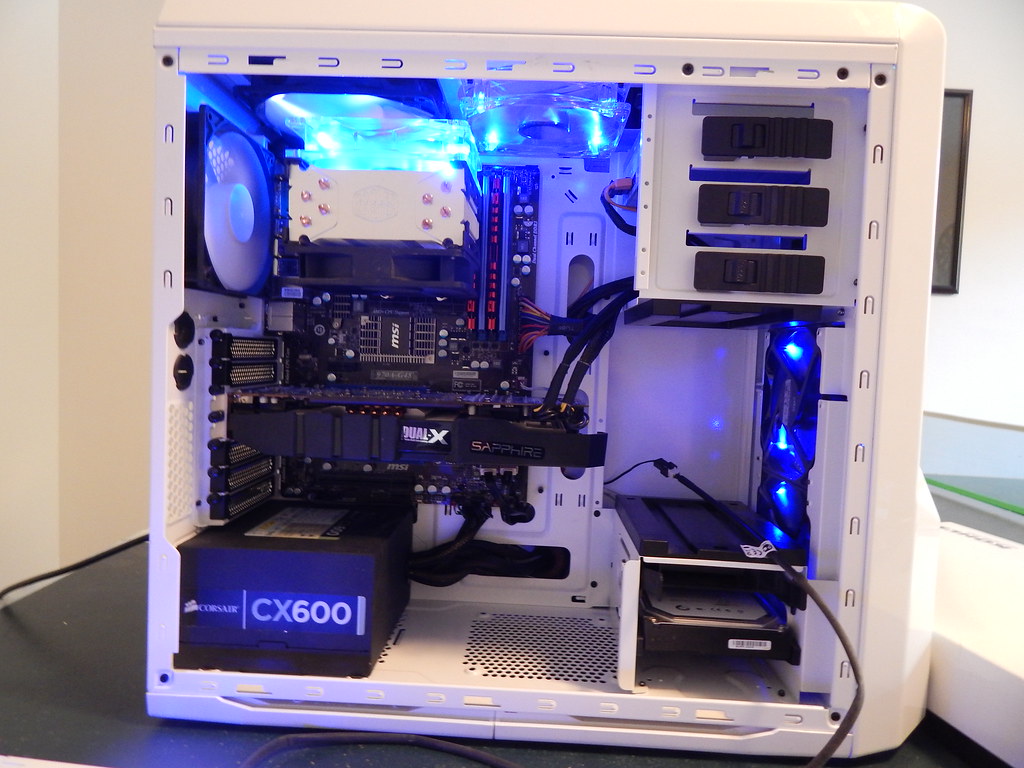
As opposed to building a fresh new system I’m going to simply tear down my current system, dust it, and rebuild it. The parts I use here are as follows.
ALERT: Static electricity is something you need to be aware of before you start. It can build up simply by moving around. Each time you’re about to handle a component, touch some metal on the case first to discharge any built up static you might have. This is called grounding yourself and I've left several reminder throughout the guide to always ground yourself. Whenever you're about to handle a component, touch the case first. This is especially crucial when handling the CPU, RAM, and GPU. To further reduce the risk you should wear.... less clothes. I'm not saying you should be building in your birthday suit, but lose the jacket. Avoid socks or slippers as well and either go barefoot or wear real shoes. Also staying away from carpet helps, but it isn't a dealbreaker either if that's all you have to work with. If you want to get an Anti-Static wrist band that’s fine but ultimately not needed.
Preparing Your Workspace
First you will want to find a good place to work. A sizable table works well and preferably on a floor other than carpet. You want to avoid static electricity as much as possible. Building on the floor is fine if you want, but avoid carpet. I used a ping pong table. Also grab a Phillip’s head screwdriver. Magnetized ones are helpful but not required. Your case or motherboard may have come with some plastic zipties, or if not, grab some of your own.
Prepare the Case
First step you will want to start with is get your case ready.
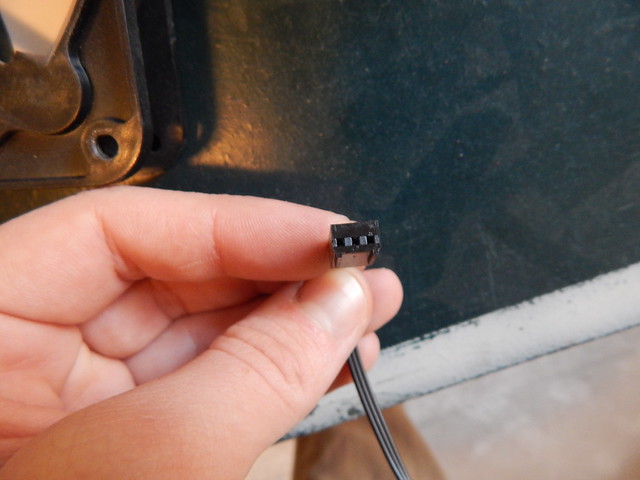
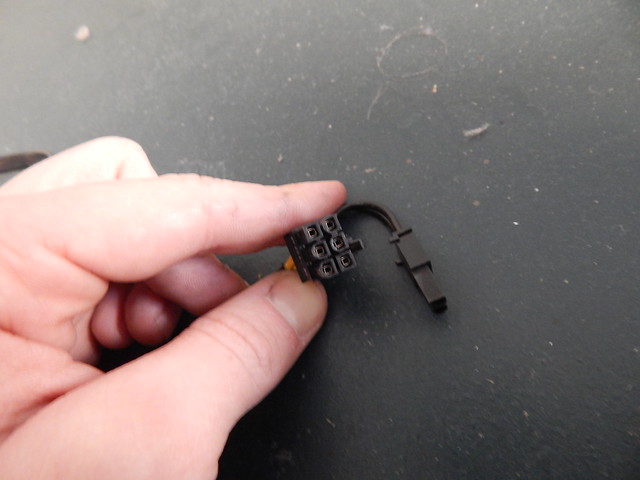
If you have any extra fans you’re adding to you case install those now. Keep in mind of how you’ll want to hook these up later, whether it be to the motherboard or directly to the power supply. If you’re hooking them up to the motherboard they’ll use a 3 pin connector and if they’re being plugged in to the PSU they’ll use a 4 pin Molex connector. Also take note of the direction of airflow. There’s normally an arrow on the side of the fan showing the direction of airflow. Typically you want the front and side fans (if you have any) to be intake and the top and back to be exhaust. Again this will vary depending on your set up. Fans installed on the front of the case will sometimes use longer screws. They go in through the front of fan then screw in to the case.
3 Pin Fan Plug (left) - Plug into Motherboard or Fan Controller
Molex (right) - Plug in to PSU
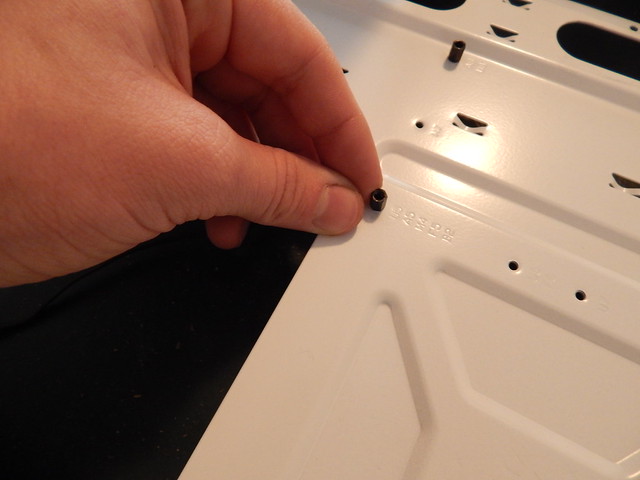
Now that your fans are ready it’s time to install the standoffs. These little metal pieces lift the motherboard off the case and prevent it from shorting out. These are REQUIRED. If you forget one the board can and probably will short and the computer won’t turn on. The layout for these will vary depending on your motherboard form factor but ATX is the most common and what I have here. Consult your motherboard (or case) manual if you are unsure. There is also a chance that the standoffs come preinstalled. If they do make sure they are in the same configuration as the motherboard you’re using. If not, arrange them correctly and just finger tighten them down in the correct place.
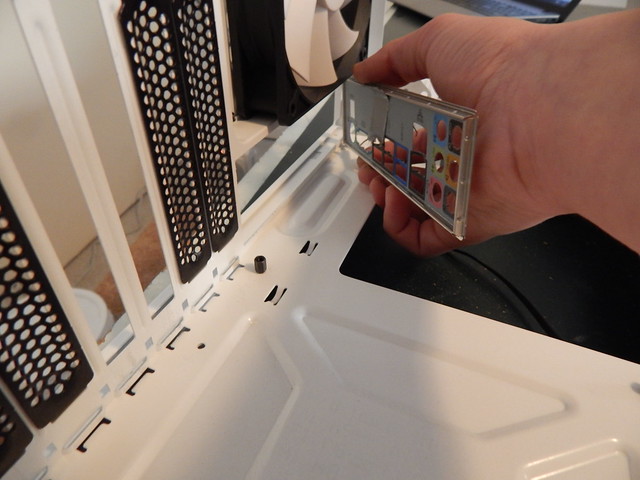
Once the standoffs are in you’ll have to install the I/O shield. If the case comes with one already in there go ahead and pop it out by pushing on it from the outside. If it doesn’t have one, which it probably won’t, just grab the one that came with your motherboard and put it in. Be careful not to bend the metal prongs on it as they’re there to prevent the motherboard from shorting again the shield. Just line it up and snap it into place. Pressure along the edges of the shield works best.
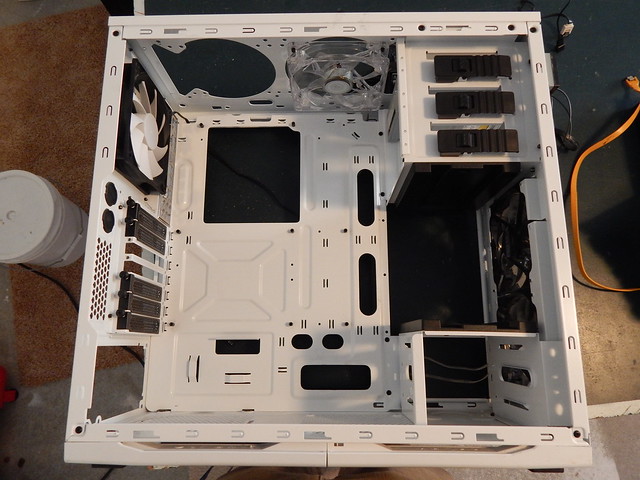
Now your case is ready!
Motherboard and Core Components
GROUND YOURSELF
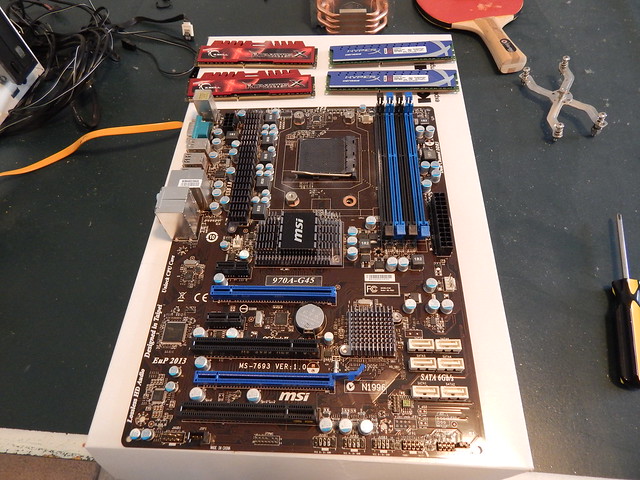
Place your motherboard on a piece of cardboard or a similar non conductive surface. The box your motherboard came in works perfectly for this. Starting off we’ll install the RAM.
RAM
GROUND YOURSELF
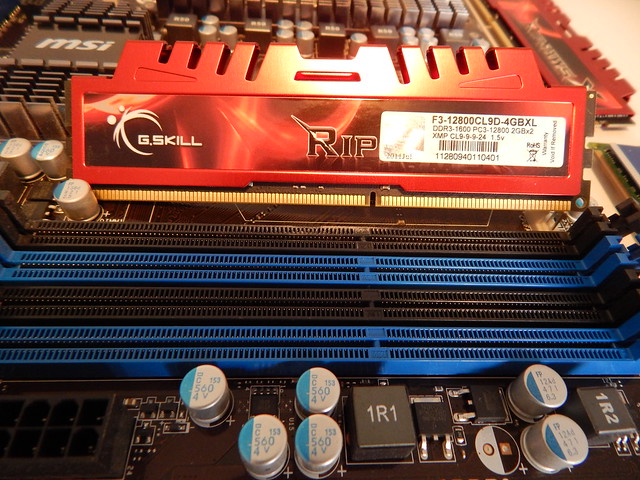
The RAM is one of the easiest things to install. Your RAM slots will most likely be near your CPU socket. With DDR3 RAM as shown here there will be a notch in both the slot and the stick of RAM. Line these up. Make sure the little plastic clips on the end of each slot are out and then line up the stick and press it into place. This can take a decent amount of pressure. Apply even pressure at both ends until the clips snap fully into place. Motherboards frequently make use of Dual Channel mode which operates slightly faster than without. This means you’ll want to install the RAM sticks in corresponding lanes. Typically the first and third slot and the second and fourth slot. Consult your motherboard manual for what is recommended as some prefer to use slots one and three over two and four, or vice versa. If you have two kits of two sticks each just make sure they correspond similar to how I have mine here.
CPU
GROUND YOURSELF
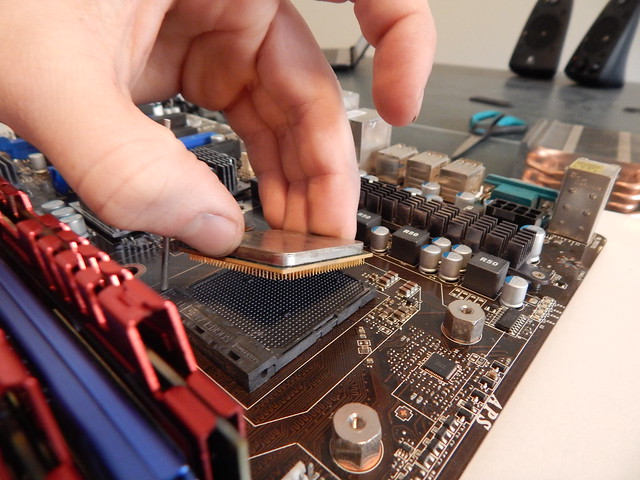
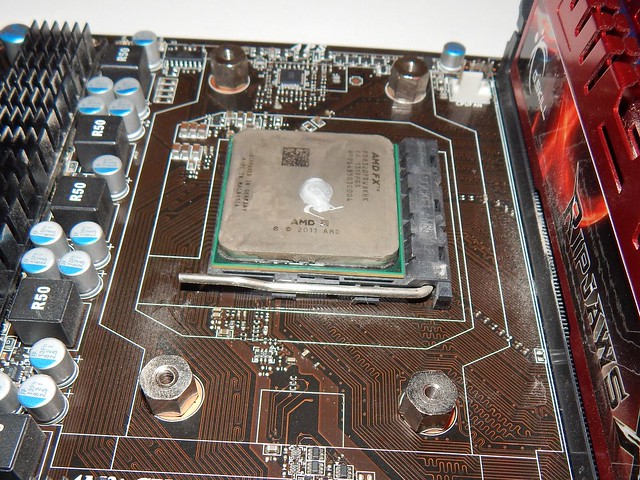
The CPU and the CPU cooler are probably the scariest things to install. Fear not though, it’s still relatively simple. This step will vary slightly depending on if you have an AMD or an Intel chip. For my AMD chip there’s simply a lever, for Intels, it’s a bit different as they have a “door” of sorts built in that you put the CPU under then clamp down. Be very careful of how you handle the CPU. Only hold it by the edges and DON'T BEND THE PINS. Find the little triangle on the corner of the CPU and line it up with the corresponding triangle on the CPU socket. If you can’t find the triangle on the socket (it’s pretty hard to find sometimes) try and use the layout of the pins on the bottom of the CPU or consult your motherboard manual. For mine it’s in the upper left. The CPU can only go in one way so make sure you have it facing the correct direction. With the lever lifted up and the door out of the way if applicable, PLACE the CPU in to the socket. Do not apply any sort of pressure to the chip. It should simply fit right in to place. If it’s not sitting completely flush you probably have it in the wrong way. Once it’s in, lower the retention lever until it is clipped in to place.
CPU Cooler
GROUND YOURSELF
Note: As pointed out to me by StrangleHold, some larger air coolers can block access to the spots where your motherboards screws in to the case. Figure out where these are and see if your cooler will obstruct them. If it does then skip this step and come back to it after you've install the board in to the case. It's still possible to install the cooler while it's in the case, but I find it easier to do it outside of it, cooler permitting.
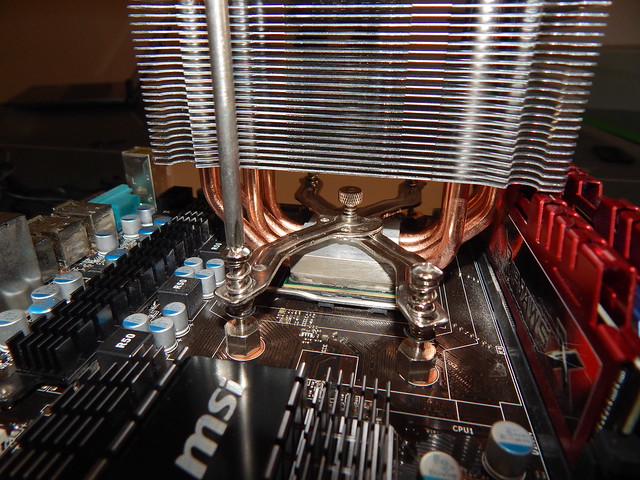
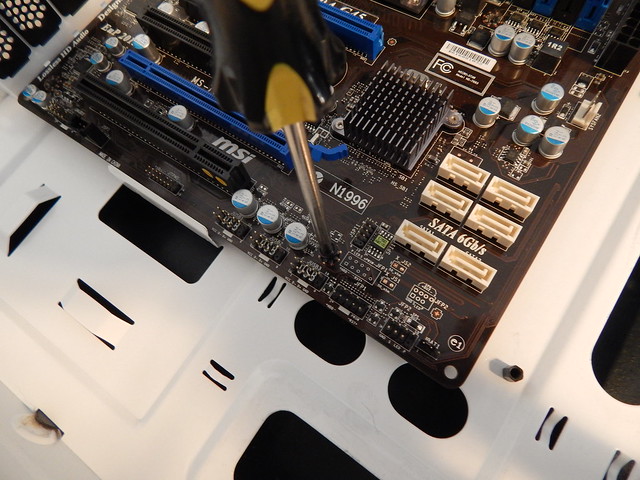
The CPU cooler is definitely the hardest and this step will vary significantly depending on your cooler. AMD chips at time of writing use a pretty simple clip on each side. Intels use a push pin setup that is also relatively simple. Some coolers will come with the thermal paste already applied. If not you’ll have to do it yourself. Squeeze a very small amount in the middle of the CPU. No bigger than a grain of rice, if that even. Refer to the picture for reference on size. You’ll need to consult your manual for your cooler on how to install it or even a video on Youtube as the instructions can be pretty cryptic. My cooler for example has a backplate you screw into the board using washers then a pair of crossed arms go underneath the cooler and are screwed in to place as shown. Notice the four screw down points in the first picture.
Also don’t forget to plug in the fan to the CPU Cooler header. It should be near the CPU socket. Consult your motherboard manual if you can’t find it.
Alright your motherboard is ready to go in to the case, so let’s do just that!
Into the Case
GROUND YOURSELF
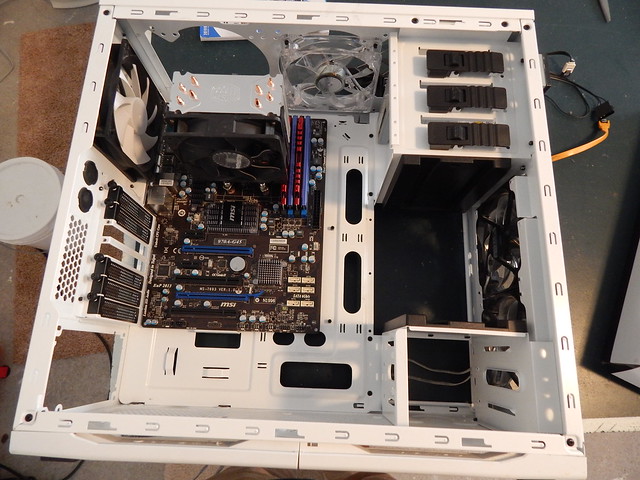
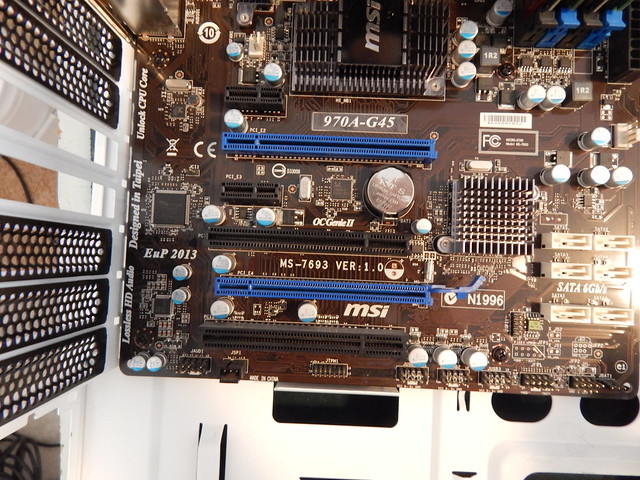
Being careful to line up the standoffs as well as the I/O shield, place your motherboard into the case. Be extra careful of lining everything up. In my experience the board will like to shift away from the I/O shield as it tends to push on it. Go around and screw the motherboard into the standoffs with the provided screws. If the holes aren’t perfectly lined up you might have to apply pressure on the side of the board as you screw it in. Make sure you get ALL of the spots that have a standoff.
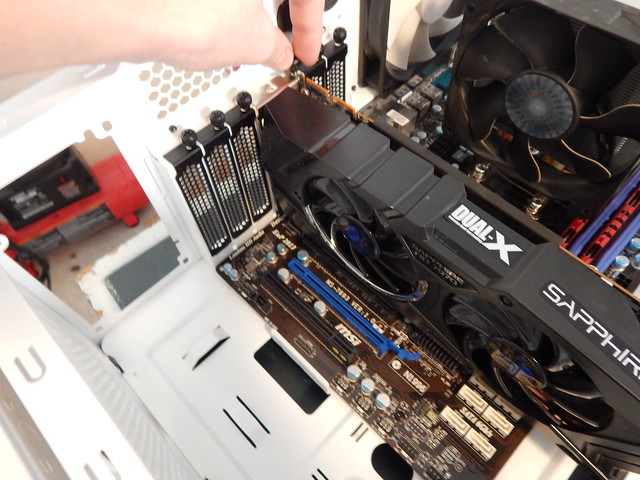
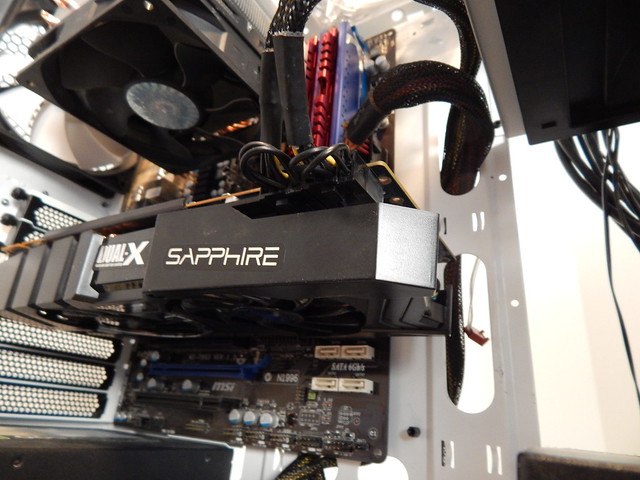
Now for the graphics card. If you don’t have a dedicated video card you can skip this step. Also most other expansion cards are installed in the same way. Find the PCI-Express lane you will be using. Typically you want to use the upper of these closer to the CPU if you have multiple slots. The PCI-E lanes normally have some sort of retention clip on the end. My computer was dropped at one point and the clip snapped off from the force but probably saved my GPU in the process. Still works fine though without it and you can see my other PCI-E lane has the clip still. Once you find the lane you’ll be using remove the expansion bay covers that correspond to it. You’ll probably have to remove two of them but again, this varies based on your card(s). Some cases have a little slot that these will slide into to strengthen the bracket a bit. Take note of these if you have them as it can sometimes make it tricky to get the card in. Like the RAM this might take some pressure, but be CAREFUL applying it. Chances are your video card is pretty sizable and it’s going in to a small slot. Make sure everything is lined up exactly right before applying pressure. Once it’s in place go ahead and use the screws that were either already in the slot or provided with the case to secure it.
Drives
GROUND YOURSELF
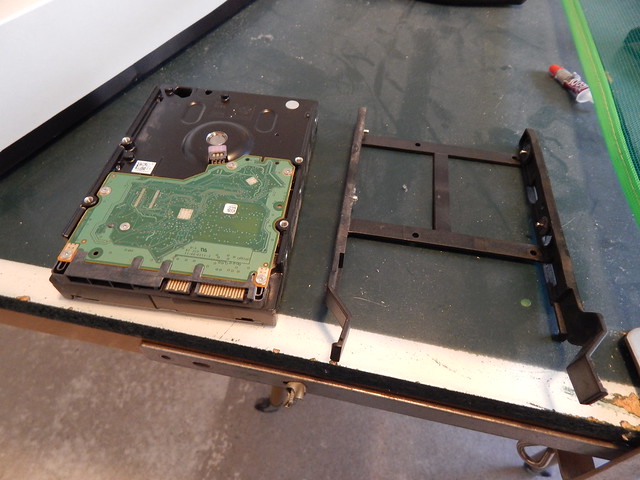
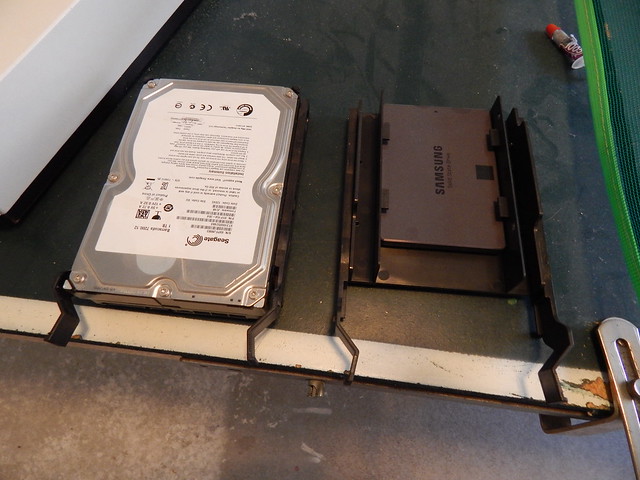
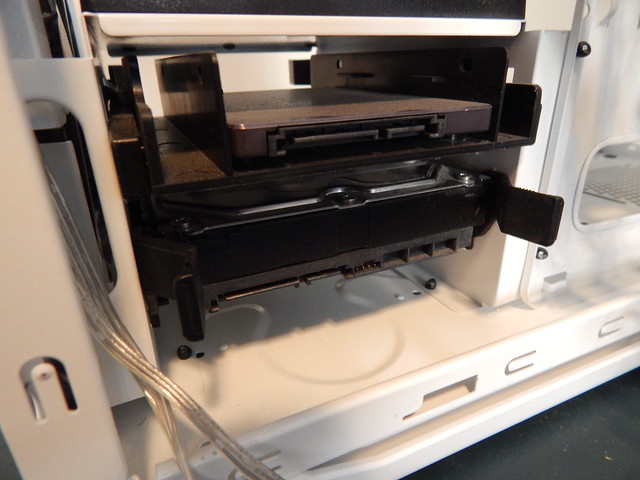
Your core components are now ready to go! Next we move on to drives. The way these go in will once again vary based on your case. For the hard drives they might come with a little caddy like mine do or they simply might have rails you pop in to the sides and then slide into the cage. For cable management purposes point the SATA and power connectors on the drive to the side of the case with the motherboard tray. This should be fairly simple but consult your case manual if you have any issues. Also now is the time to install any disc drives or any other accessories you’re putting in to the machine. Disc drives can be a bit tricky depending on the case as you might have to remove the front panel to get them to fit correctly. Consult your case manual to see how they should go in. For my Phantom I have to remove the front panel and slide them in from the front. The mounting hardware on the side also varies but is normally pretty intuitive. When in doubt, check your case manual.
Power Supply (PSU)
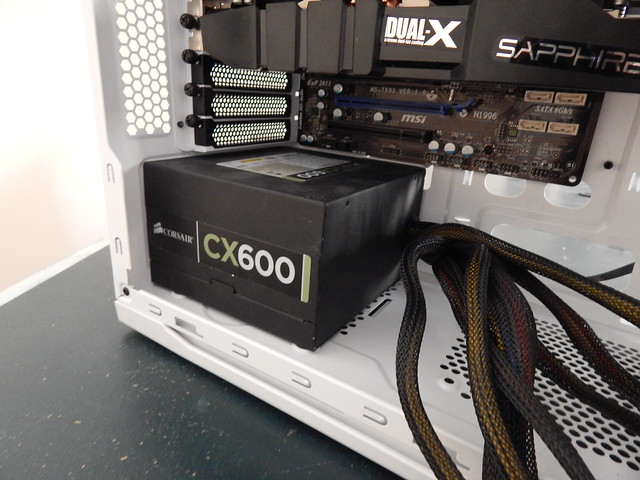
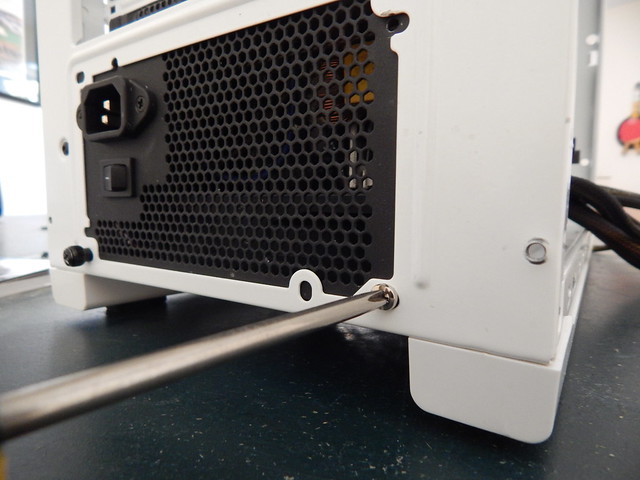
By this point your system should be starting to look closer to finished. You have all your core components in. Now you just have to power it all! The power supply location is obvious and is easy to install. If you’re case has feet on it and you don’t plan on putting the computer directly on carpet (which you should never do) go ahead and point the power supply fan down so it’s pulling in cool air from outside rather than warm air from inside your case. If for some reason this doesn’t work due to your case, just flip it over, it doesn’t make a huge difference. With my PSU, if it’s fan down it also places all the cables closer to the motherboard tray, which is good for keeping cable clutter down. PSU should go in with a few screws into the back. In my experience I have times where I can’t get all 4, or even 3, screws into the PSU due to obstruction by the case. If the PSU is bottom mounted as is pretty standard these days, it’s not a huge deal if you’re missing a screw or two.
Cable Management
GROUND YOURSELF
This section could really be a whole guide of its own but I’ll try and suggest a few things I’ve picked up over several cases I’ve worked on.
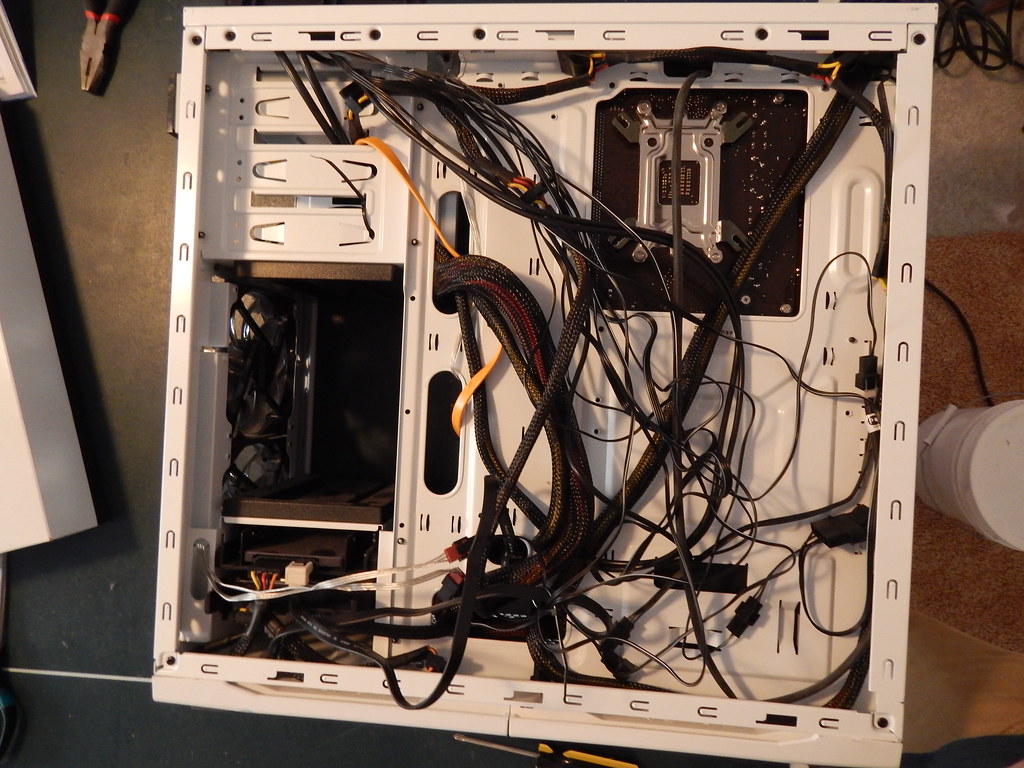
Generally you’ll want to start with a cable at the power supply, route it behind the motherboard tray, up to an appropriate exit point, back in front of the motherboard tray, then plug it in where it should go. This obviously will vary a lot based on your case and the length of your PSU cables. Also if you have a cheaper case you’re less likely to have much space behind the motherboard tray and might have to route more cables in front of it.
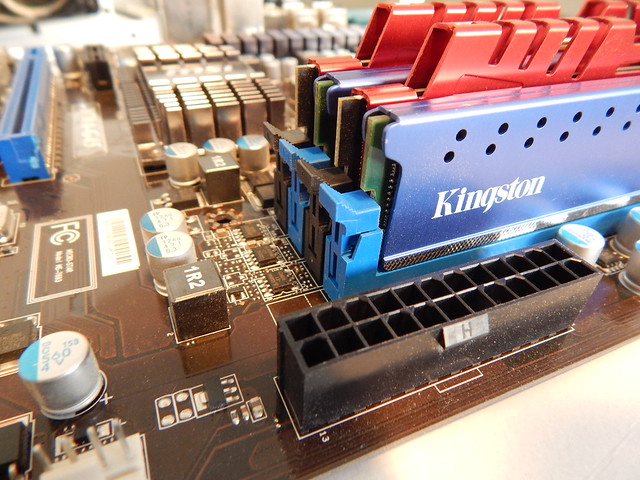
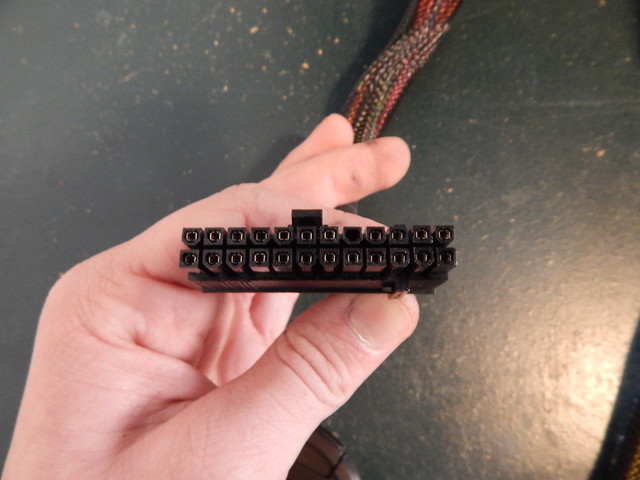
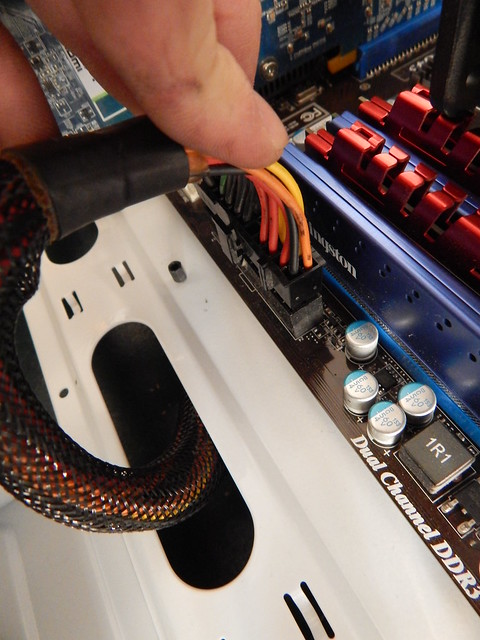
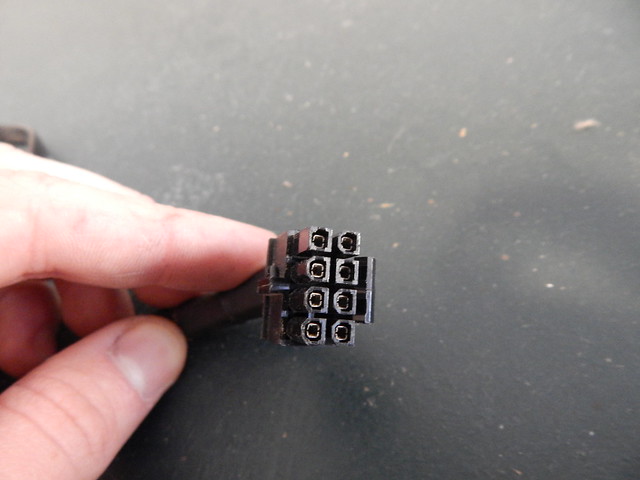
Start by placing the case upright and removing the other side panel. Your first cable should be the 24pin ATX connector followed by your 8pin CPU connector. The 24pin will be your thickest cable and a lot of cheaper cases won’t have space for it behind the motherboard tray. If that’s the case (haha get it, case) just plug it in without going behind the tray.
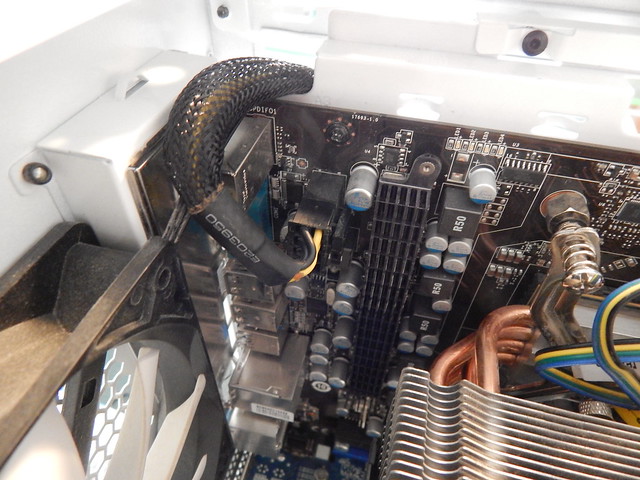
The 8pin CPU connector will probably be able to fit behind the tray if you have a close exit point and/or a long cable. Some cases have a little hole dedicated to this so you don’t have a long cable snaking its way across your case, but instead can hide it behind. This can be a bit tricky to get to, and for the Phantom I have to remove the top fan to get to it. If there isn’t a spot or you can’t reach it, just put it in front of the motherboard tray.
Next move on to your GPU cables if applicable. Your PSU should have the required 6/8 pin connectors for this. Route them like before and plug them in. If your PSU doesn’t have the required cables you can use a Molex 4pin connector to the 6/8 pin GPU connector. For my cables I tied them in to my drive cage to hide them a little bit.
Continue this cable routing tactic with your SATA power cables as well. There are typically multiple connections on one cable so you might have to get creative with how to do this with multiple drives. You can also hook up any fans that you’re going to plug in to the power supply now.
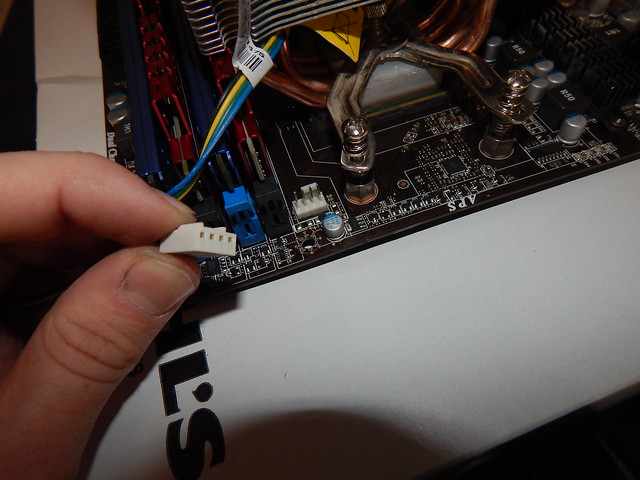
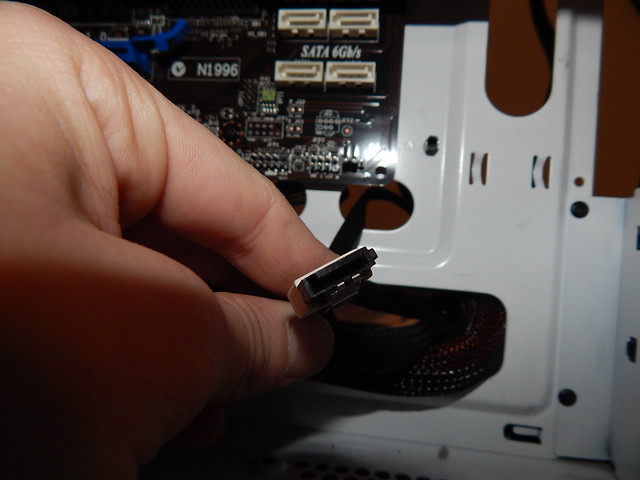
SATA Power (left)
SATA Data (right) The white plugs in the background are what this goes in to
Finally you should hook up your SATA cables and front panel connectors to their respective headers on the motherboard. This will vary based on your motherboard, so make sure you consult that. If there’s 2 prongs for something such as your power switch, it can be plugged in either way. Try and route these behind the board if possible. The headers are typically on the lower part of your board near your SATA connections. Your motherboard manual will tell you what plugs in to what. It's pretty straightforward but a bit cumbersome to deal with tiny little cables and headers if you've got fat hands like me.
If you have a system speaker install that now also. Your case or motherboard may come with one, but not necessarily. This speaker should just beep when the computer successfully boots.
SATA cables will connect to their respective drive then plugged in to the motherboard. Most boards have SATA 3 6GB/s for all ports but of course it will vary. Consult your motherboard manual to see what speed each port is. Make sure your SSD (if you have one) and your hard drive(s) are hooked up to the fastest SATA ports you have with preference for the fastest port being used by your SSD if applicable.
Also hook up any other fans that you wanted to plug in to the motherboard. Check your motherboard manual for locations on the fan headers you’ll want to plug these in to.
A few tips about Cable Management
- Use a screwdriver to wrap fan cables around to coil them up and prevent excessive cabling. Works well on the CPU fan especially.
- Be aware of how much space you have to work with. Don’t try to get too much behind the motherboard tray, especially on a cheaper case. If your case costs less than around 75 USD then there’s a decent chance you won’t be able to fit everything back there.
- Once all your cables are in place go around using plastic zipties and cinch them down. Don’t make them too tight though as you want to be able to cut them off later. You can also use velcro straps or anything else that’s not conductive and won’t melt or be flammable.
- Don’t be discouraged on your first attempt at this. Figuring out how your cables can work takes some practice. If you’re antsy about getting your system up and running always remember you can come back later and tidy it up a bit.
- While not critical, cable management does improve airflow through the case and cleans the look up significantly, especially nice with a windowed case.
- Use the tie down points behind the motherboard tray to tidy up cables back there. It doesn’t’ have to look good, but you need to be able to get the other panel on. Spread out the cables so you don’t have a giant stack of them in one place that would prevent the right side panel from being installed.
- Getting the right side panel on might be tough, don’t be afraid to press down on the panel a bit to get it to get it in place. I find it works best to place the computer with that side up and have somebody push down on the panel while you slide it back into place. Make sure all sides are flush.
Conclusion
That’s it! Your machine should be assembled. Put the left side panel back on, plug it in, flip the power supply on, and press the power button on the front. Hopefully it should kick to life! If on the small chance that it doesn't, head over to Jason's Tech Guide.
To install your Operating System you'll need to insert your installation media and boot from it. Enter your BIOS and change the boot order to the installation media being first and follow the onscreen instructions. (Another member should make a guide on this).
Feel free to make suggestions or comments in this thread!
Revision History
1/27/15 - Initial draft, pictures forthcoming
1/27/15 (later) Initial Version complete. All pictures added
Thanks! I added a few lines about grounding yourself. There's a guide on how to install an OS but it's specifically for a flash drive. Mainly we just need one on how to enter the BIOS, set the boot order, and install the OS from whatever media you have.
You did an incredible job on this. Excellent pics, love the font selection and formatting in general. Very well written guide. On behalf of the internet, I thank you sir.
Appreciate it very much Mep. I underestimated how long it takes to format 40 pictures and a wall of text. I had the entire guide and all the pictures uploaded and ready to go and it still took me well over an hour to get it all together! Also I discovered there's a 20 image limit on posts.
One thing I might add, sometimes its not wise to install the CPU cooler before putting the board in the case. Large coolers can cover some motherboard screws making it impossible getting to them. Would probably add, make sure you have clearance for motherboard screws before making the decision of installing the cooler first.
You know I actually hadn't thought of that. I did have that issue a little bit with my 212 but just taking off the fans made it easy to get to. Also every build I've ever worked on either used a 212 or the stock fan so never ran in to that issue before. I'll make a note of it.
Thanks everyone for the positive feedback! Don't be afraid to nitpick, I want it as good as it can be.
Jason, I figured it would be best to shamelessly plug other people's guides on here to kind of promote on forum activity. A lot of times we link to other places for advice on how to do something. Keeping people here is what we want.


") ).
).