Help.
I would be eternally indebted to anyone who could help me with a problem I have in relation to burning analogue video footage onto a DVD.
I have a Sony VAIO 215Z. I have an Adaptec "VideOh! AVC 2210" capturing device.
I used the capturing device to capture footage that originally came from my Panasonic analogue video camera but which was then transferred onto DVD-R. I therefore captured footage from my DVD player and saved the resulting mpeg file to my computer.
My problem is this. In using Sony's "Click to DVD" software, I am able to import mpeg files created from a Sony digital camera. I am not, however, able to import mpeg files that were captured by my Adaptec device (I get a error message). I am however able to play these mpeg files on my VAIO.
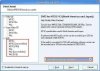
Does anyone know how I can successfully import the captured mpeg files and burn them to DVD? Do I need to convert the files to a compatible mpeg format? They are mpeg2 but apparently that is fine for use on a VAIO.
I thought maybe I should try and capture the footage through "Click to DVD" but when I tried that, the computer told me to connect the external device and turn it on" even though I had already done so. Would connecting by firewire make any difference? When I connect by a USB port the VAIO makes a sound as if to acknowledge the hardware yet still tells me to connect it.
I would be amazed if anyone is able to sort this problem out for me but I would be seriously grateful and dinner invitations will abound if anyone can!
Many thanks in advance.
I would be eternally indebted to anyone who could help me with a problem I have in relation to burning analogue video footage onto a DVD.
I have a Sony VAIO 215Z. I have an Adaptec "VideOh! AVC 2210" capturing device.
I used the capturing device to capture footage that originally came from my Panasonic analogue video camera but which was then transferred onto DVD-R. I therefore captured footage from my DVD player and saved the resulting mpeg file to my computer.
My problem is this. In using Sony's "Click to DVD" software, I am able to import mpeg files created from a Sony digital camera. I am not, however, able to import mpeg files that were captured by my Adaptec device (I get a error message). I am however able to play these mpeg files on my VAIO.
Does anyone know how I can successfully import the captured mpeg files and burn them to DVD? Do I need to convert the files to a compatible mpeg format? They are mpeg2 but apparently that is fine for use on a VAIO.
I thought maybe I should try and capture the footage through "Click to DVD" but when I tried that, the computer told me to connect the external device and turn it on" even though I had already done so. Would connecting by firewire make any difference? When I connect by a USB port the VAIO makes a sound as if to acknowledge the hardware yet still tells me to connect it.
I would be amazed if anyone is able to sort this problem out for me but I would be seriously grateful and dinner invitations will abound if anyone can!
Many thanks in advance.
") Post back if you have any problems
Post back if you have any problems